
Kunafa (Knafeh Dessert) is one of those sweets that solves a very specific problem: you want something warm, gooey, and impressive, but you do not want to spend all day in the kitchen. I first made it after a dinner with friends when we were all bored of the same brownies and cookies. I was nervous because it looked fancy in bakery windows, but it turned out way more doable than I expected. The smell alone made everyone wander into my kitchen like curious cats. If you have ever wanted a dessert that makes people say wow on the first bite, this is the one.
Why This Recipe Works
The magic of Kunafa (Knafeh Dessert) is that it hits a few textures at once: crispy top, soft center, and that syrup that soaks in just enough. This version works because it keeps the steps simple and focuses on the few details that actually matter.
First, you butter the shredded phyllo well, so it bakes up golden and crunchy instead of dry. Second, you use a mild cheese filling that melts without fighting you. Third, the syrup is warm but not boiling when you pour it on, so it soaks in gently and does not turn everything soggy.
I also like that it is flexible. You can make it more cheesy, more creamy, or more crunchy depending on what your people like. If you are into Middle Eastern sweets in general, you might also enjoy browsing my dessert recipes collection for similar cozy, shareable treats.
One more reason it works: it is a great make ahead dessert. You can assemble it, chill it, and bake it when guests arrive. That means you get fresh Kunafa vibes without being stuck cooking while everyone else is chatting.
Ingredients Needed and Where to Find Them
You do not need anything super rare, but a couple items might be new if you have never made Kunafa (Knafeh Dessert) at home. Most Middle Eastern grocery stores will have everything. Some larger supermarkets also carry kataifi in the freezer section.
Shopping list you will actually use
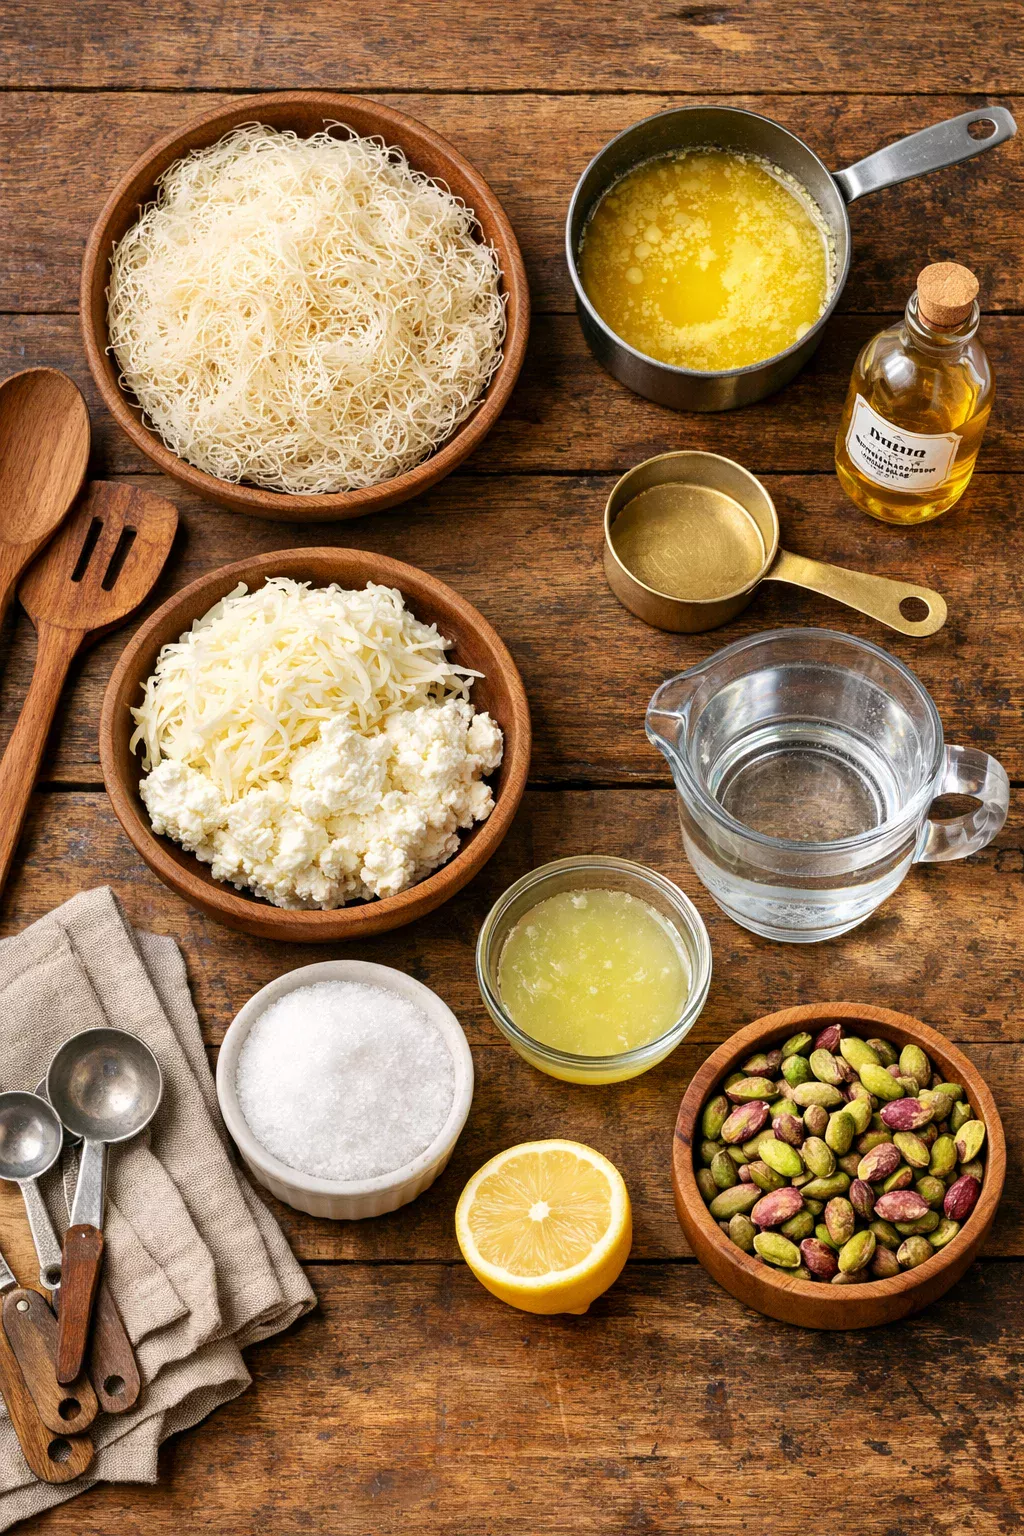
- Kataifi shredded phyllo dough, usually sold frozen
- Butter melted, or ghee if you like a richer flavor
- Cheese like mozzarella (low moisture) plus a little ricotta or cream cheese for softness
- Sugar for the syrup
- Water for the syrup
- Lemon juice just a squeeze to keep syrup from tasting flat
- Orange blossom water or rose water optional but very traditional
- Pistachios chopped, for topping
About the cheese: in many traditional versions, people use a sweet cheese like nabulsi or akkawi. If you cannot find those, do not stress. A mix of mozzarella and a creamy cheese gets you that stretchy, melty middle without being salty. If you want more guidance on working with shredded phyllo, I have a quick explainer here: how to handle kataifi dough.
I promised you practical, so here is the honest truth: the syrup matters more than the cheese brand. If your syrup tastes good, your dessert tastes good. Keep it lightly fragrant, not perfume level.
How to Make Kunafa
Let us walk through it like we are cooking together. The first time I made Kunafa (Knafeh Dessert), I overthought every step. Now I treat it like a simple layered bake.
Step by step directions
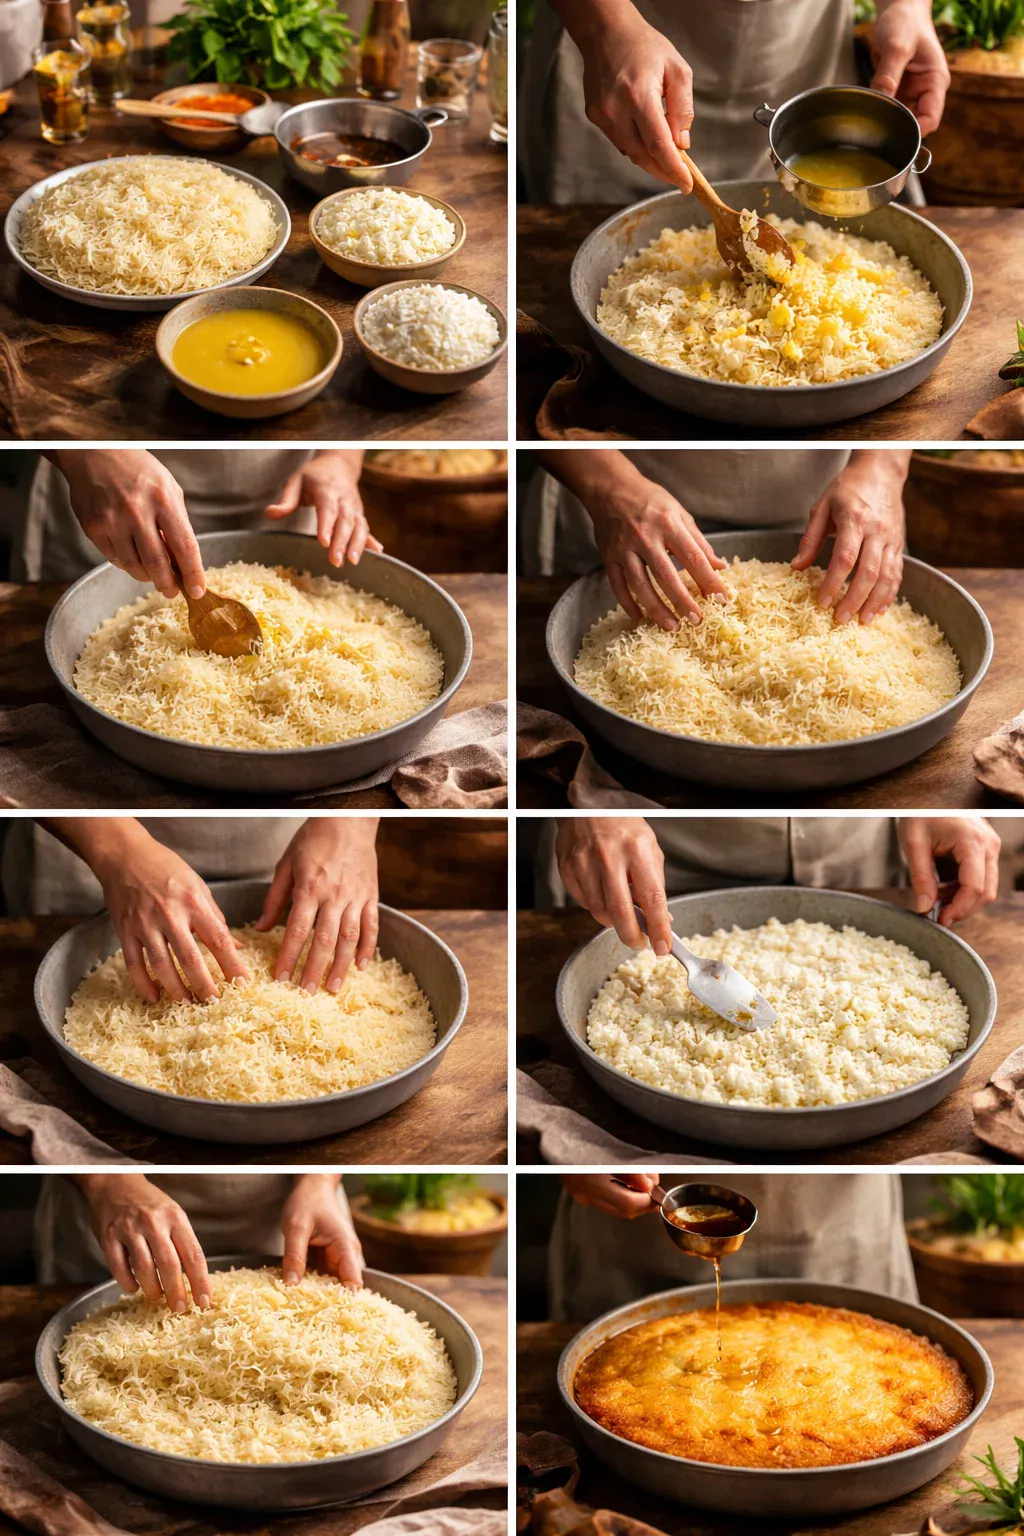
1) Thaw the kataifi. If it is frozen, leave it in the fridge overnight. If you forget, an hour on the counter usually works. You want it soft and easy to pull apart.
2) Make the syrup. In a small pot, add 1 cup sugar and 3/4 cup water. Bring to a gentle simmer for about 8 to 10 minutes until it looks slightly thicker. Stir in 1 teaspoon lemon juice. Turn off the heat and add 1 to 2 teaspoons orange blossom water or rose water if using. Let it cool until it is warm, not hot.
3) Prep the cheese filling. Mix about 2 cups shredded mozzarella with 1/2 cup ricotta or cream cheese. If your mozzarella seems salty, do not add extra anything. If it is bland, a tiny pinch of sugar is fine, but keep it subtle.
4) Butter the dough. Pull the kataifi apart into loose strands in a big bowl. Pour in 3/4 cup melted butter and use your hands to rub it in. This is the part that feels messy, but it is worth it. Every strand should look glossy.
5) Build the layers. Grease your pan. Press about two thirds of the buttered kataifi into the bottom, making a snug layer. Add the cheese mixture evenly, leaving a small border around the edges so it does not leak too much. Top with the rest of the kataifi and press lightly.
6) Bake. Bake at 375 F (190 C) for 30 to 40 minutes, until the top is deep golden brown. If your oven runs cool, give it a few extra minutes. You want real color for real crunch.
7) Syrup time. Take it out of the oven and immediately pour the warm syrup over the top, starting with about three quarters of it. Pause, listen to the sizzle, and let it soak. Add the rest if you like it sweeter and softer.
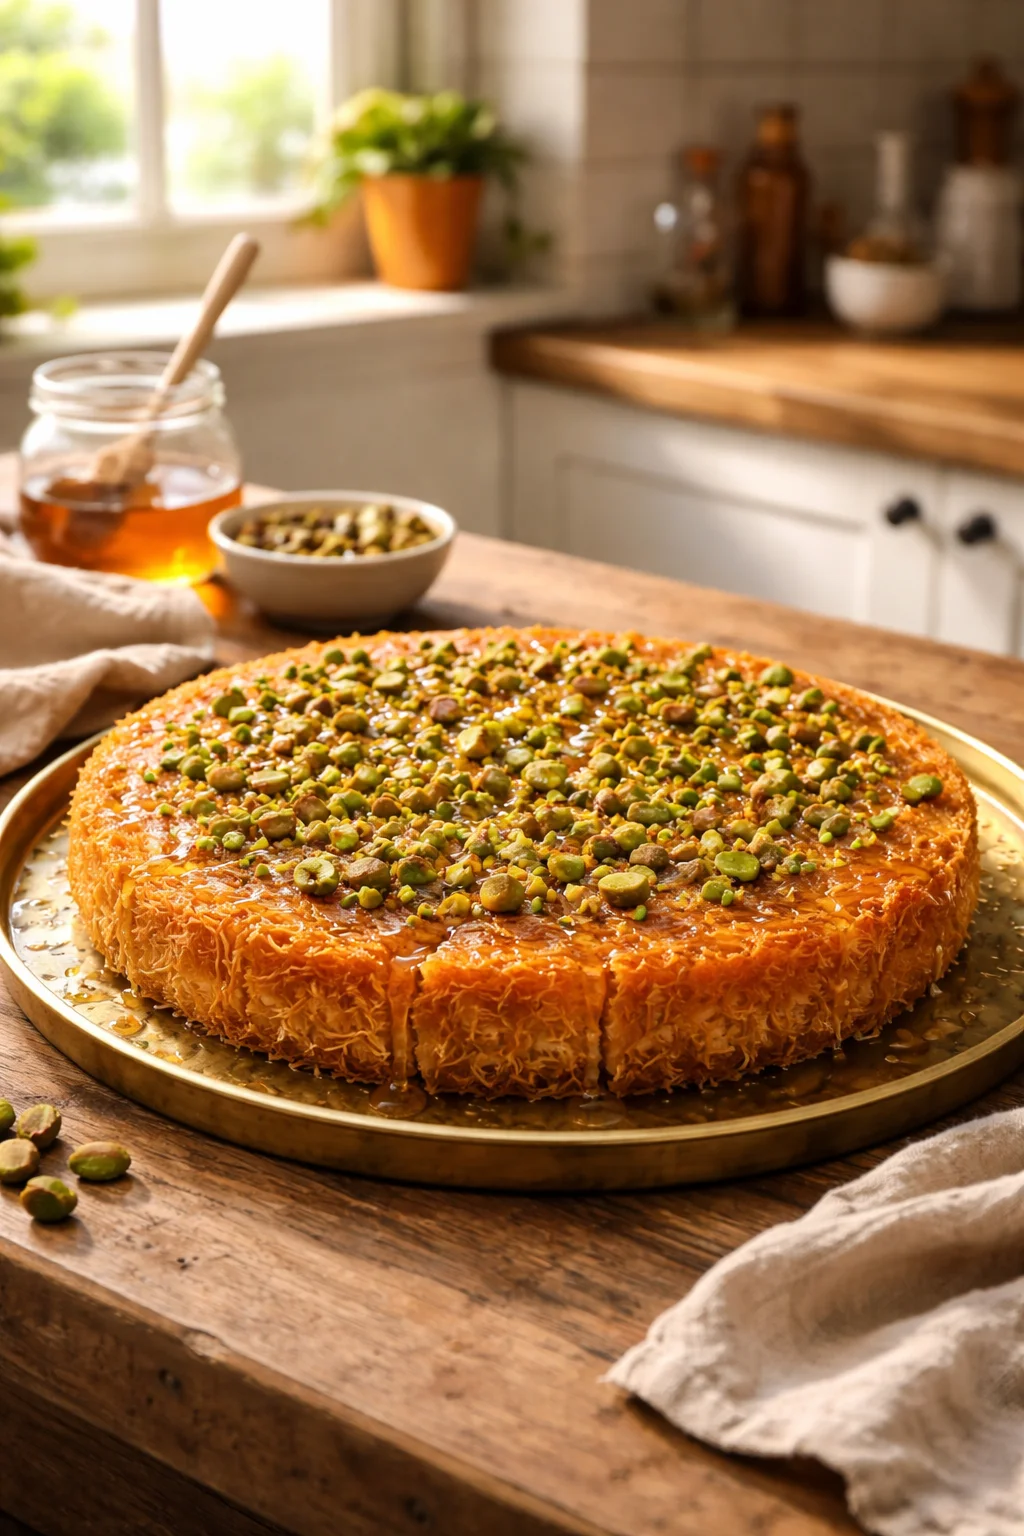
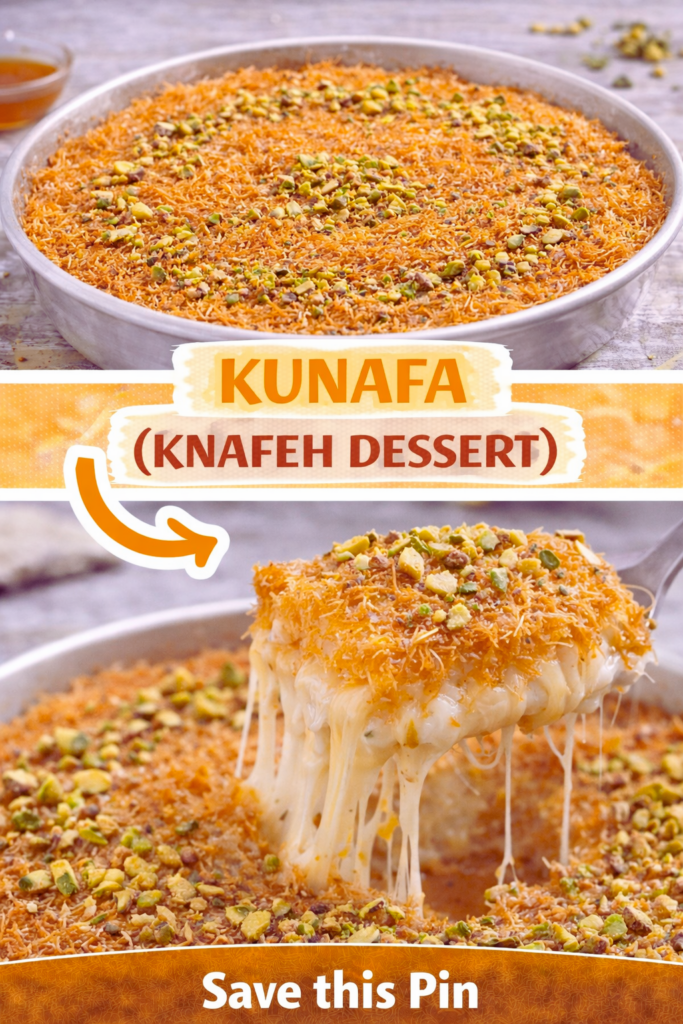
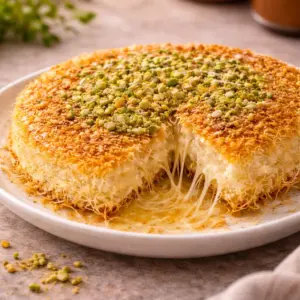
8) Rest and flip (optional). Let it sit 10 minutes. You can serve it as is, or flip it onto a platter for that classic look. Top with chopped pistachios.
If you like serving ideas, I also keep a short list of pairing drinks and sides here: what to serve with Middle Eastern desserts.
I made this for my family gathering and everyone asked for the recipe before they even finished their plates. The crunchy top plus the stretchy cheese was the best part, and it reheated surprisingly well the next day.
Expert Notes and Tips
Okay, here is the stuff I wish someone told me before I made it the first time. These little moves make a big difference, and they keep your Kunafa (Knafeh Dessert) from turning into a dry or soggy situation.
Do not rush thawing. If the dough is still icy in spots, the butter will not coat it evenly. Uneven butter means uneven browning.
Press, but do not crush. You want the layers packed enough to slice, but not so tight that it turns dense. I press gently with my palm, not my fist.
Watch the color, not the timer. Your oven has its own personality. You are looking for a deep golden top. Pale kunafa tastes like missed potential.
Keep syrup warm. If syrup is cold, it sits on top. If it is boiling, it can make the crust lose its crunch fast. Warm is the sweet spot.
Reheating tip. If you have leftovers, reheat in the oven or air fryer for a few minutes. Microwave works, but you will lose that crispness. Still tasty, just softer.
If you are the kind of person who likes to plan ahead, you can assemble the whole pan, cover it, and refrigerate it for up to a day. Then bake when you are ready. For more make ahead tricks, I keep a simple guide here: make ahead dessert tips.
What Pan to Bake Kunafa In
You do not need a special pan, but the pan choice affects your crust. My favorite is a round metal pan, about 12 inches wide, because metal browns the kataifi beautifully.
Here is what works well:
Metal cake pan or pizza pan: Best for browning and crisp edges.
Cast iron skillet: Amazing crust, holds heat well, and looks cute for serving.
Glass baking dish: Works fine, but you may need a few extra minutes to get good color.
Whatever you pick, grease it well. Butter is classic, but a thin layer of ghee is also great. If you plan to flip it, use a pan with straight sides and do not overfill the cheese layer, because that is when leaks happen.
Also, if you are baking for a crowd and want thicker slices, use a smaller pan and add a few extra minutes of baking time. If you want a thinner, crunchier result, go wider.
Common Questions
Can I make Kunafa (Knafeh Dessert) without orange blossom water?
Yes. It is optional. The syrup will still taste great with just lemon juice, and you can add a little vanilla if you want.
What is the best cheese if I cannot find traditional knafeh cheese?
Low moisture mozzarella for stretch plus a bit of ricotta or cream cheese for softness is an easy, reliable combo.
How do I keep it crispy?
Bake until deeply golden, use enough butter, and pour warm syrup not boiling. Also, do not cover it tightly while it is still hot, because steam softens the crust.
Can I freeze it?
You can freeze it before baking. Assemble, wrap well, and freeze. Bake from thawed for best texture. Freezing after baking is okay, but it will be softer when reheated.
Why did my syrup sit on top?
Usually the syrup was too cold or the dessert cooled too much before you poured it. Next time, time it so both are warm.
A sweet finish and a little encouragement
If you take one thing from this post, let it be this: Kunafa (Knafeh Dessert) looks fancy, but it is totally doable at home when you focus on buttered kataifi, a melty filling, and a syrup that tastes bright. Try it once, and you will start looking for excuses to make it again, like birthdays, potlucks, or honestly just a random Tuesday. If you want to explore a plant based version, this Vegan Kunafa (Knafeh) | Shredded Phyllo and Sweet Cheese Dessert is a great reference. And if you like comparing methods, I also recommend reading Kunafa (Knafeh) Recipe – Amira’s Pantry for another solid approach. Now go make it, pour that syrup, and enjoy that first crunchy, gooey bite.
Kunafa (Knafeh Dessert)
Ingredients
For the dessert
- 12 oz Kataifi shredded phyllo dough, usually sold frozen Thaw before using.
- 3/4 cup Butter, melted Or use ghee for a richer flavor.
- 2 cups Low moisture mozzarella cheese, shredded For stretchiness.
- 1/2 cup Ricotta or cream cheese For softness.
- 1 cup Sugar For syrup.
- 3/4 cup Water For syrup.
- 1 teaspoon Lemon juice To keep syrup from tasting flat.
- 1-2 teaspoons Orange blossom water or rose water Optional, but traditional.
- 1/4 cup Chopped pistachios For topping.
Instructions
Preparation
- Thaw the kataifi if frozen. Leave it in the fridge overnight or let it sit on the counter for an hour.
- In a small pot, add sugar and water to make the syrup. Bring it to a gentle simmer for about 8-10 minutes until slightly thicker. Stir in lemon juice and orange blossom water. Let it cool until warm.
- Mix mozzarella with ricotta or cream cheese for the cheese filling.
- Pull the kataifi apart into loose strands; pour melted butter over it and rub it in until glossy.
- Grease your baking pan and press about two thirds of the buttered kataifi into the bottom. Spread the cheese mixture on top, leaving a small border, then cover with the remaining kataifi.
Baking
- Bake at 375°F (190°C) for 30-40 minutes until the top is deep golden brown.
Finishing Touches
- Immediately pour the warm syrup over the Kunafa after baking, letting it soak for a few minutes.
- Let it rest for 10 minutes before serving. Optionally, flip onto a platter and top with chopped pistachios.