
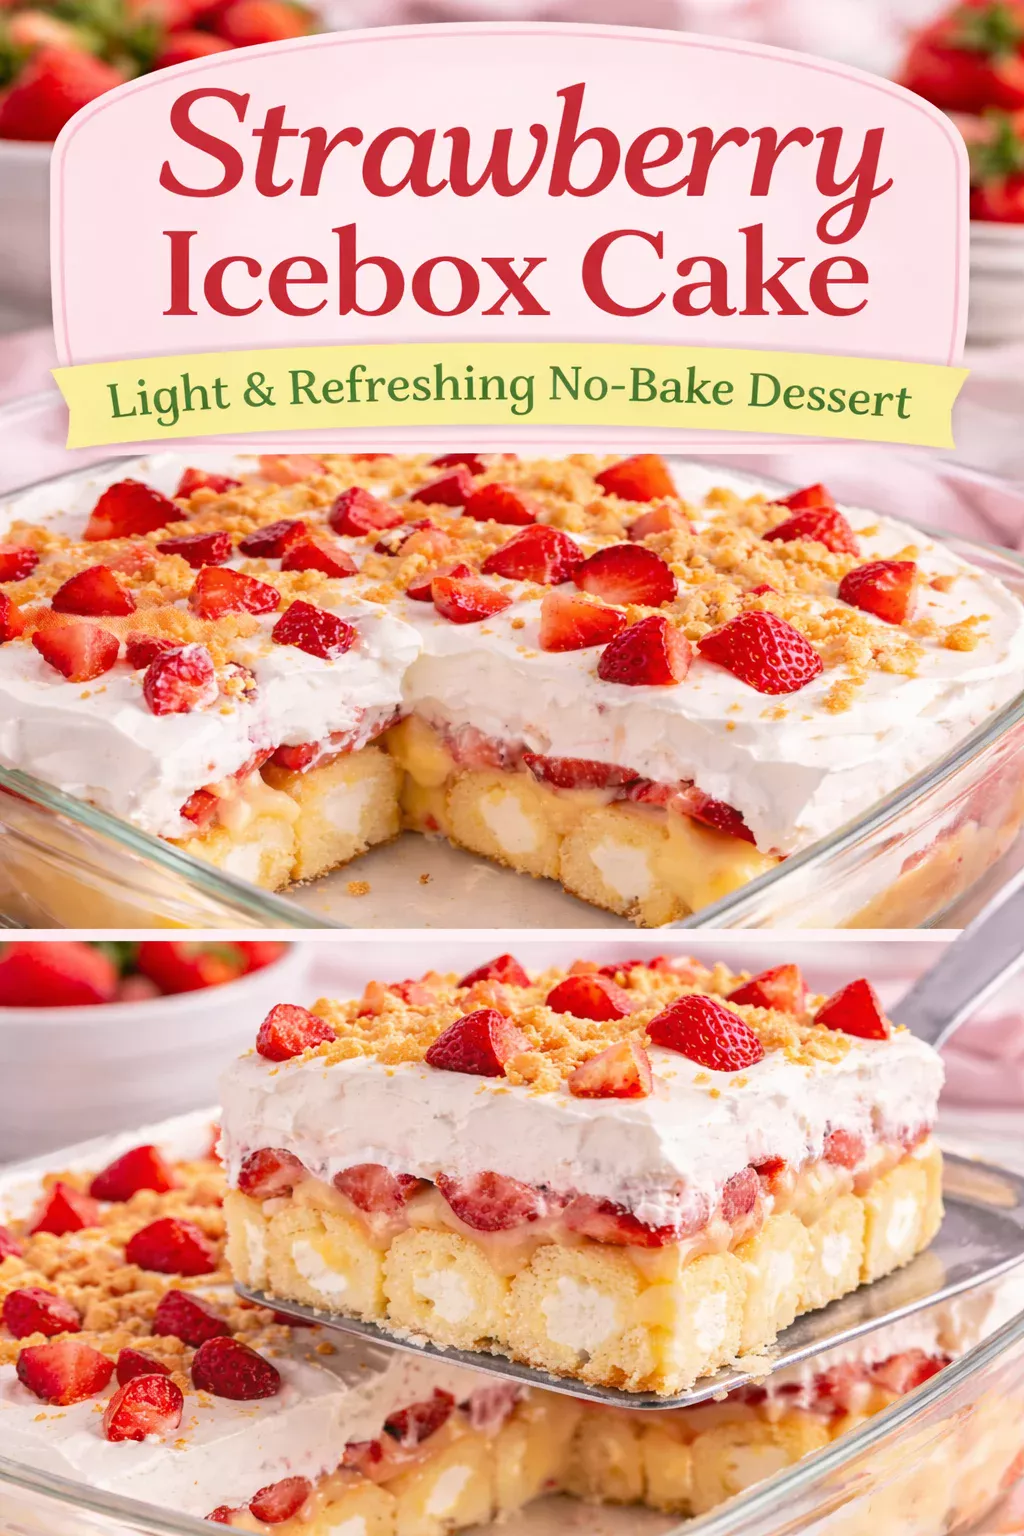
TWINKIE CAKE! (No-Bake!) is my little secret weapon for those days when you need a fun dessert but you do not want to turn your kitchen into a sauna. You know the situation: guests are coming, the kids are asking for something sweet, or you just want a nostalgic treat after a long week. This is the kind of dessert that looks like you tried really hard, even though it is mostly layering and chilling. It is creamy, light, and has that classic snack cake vibe everybody recognizes. If you have ever stared into your pantry hoping dessert would magically appear, this one is for you.
How to Make Twinkie Cake
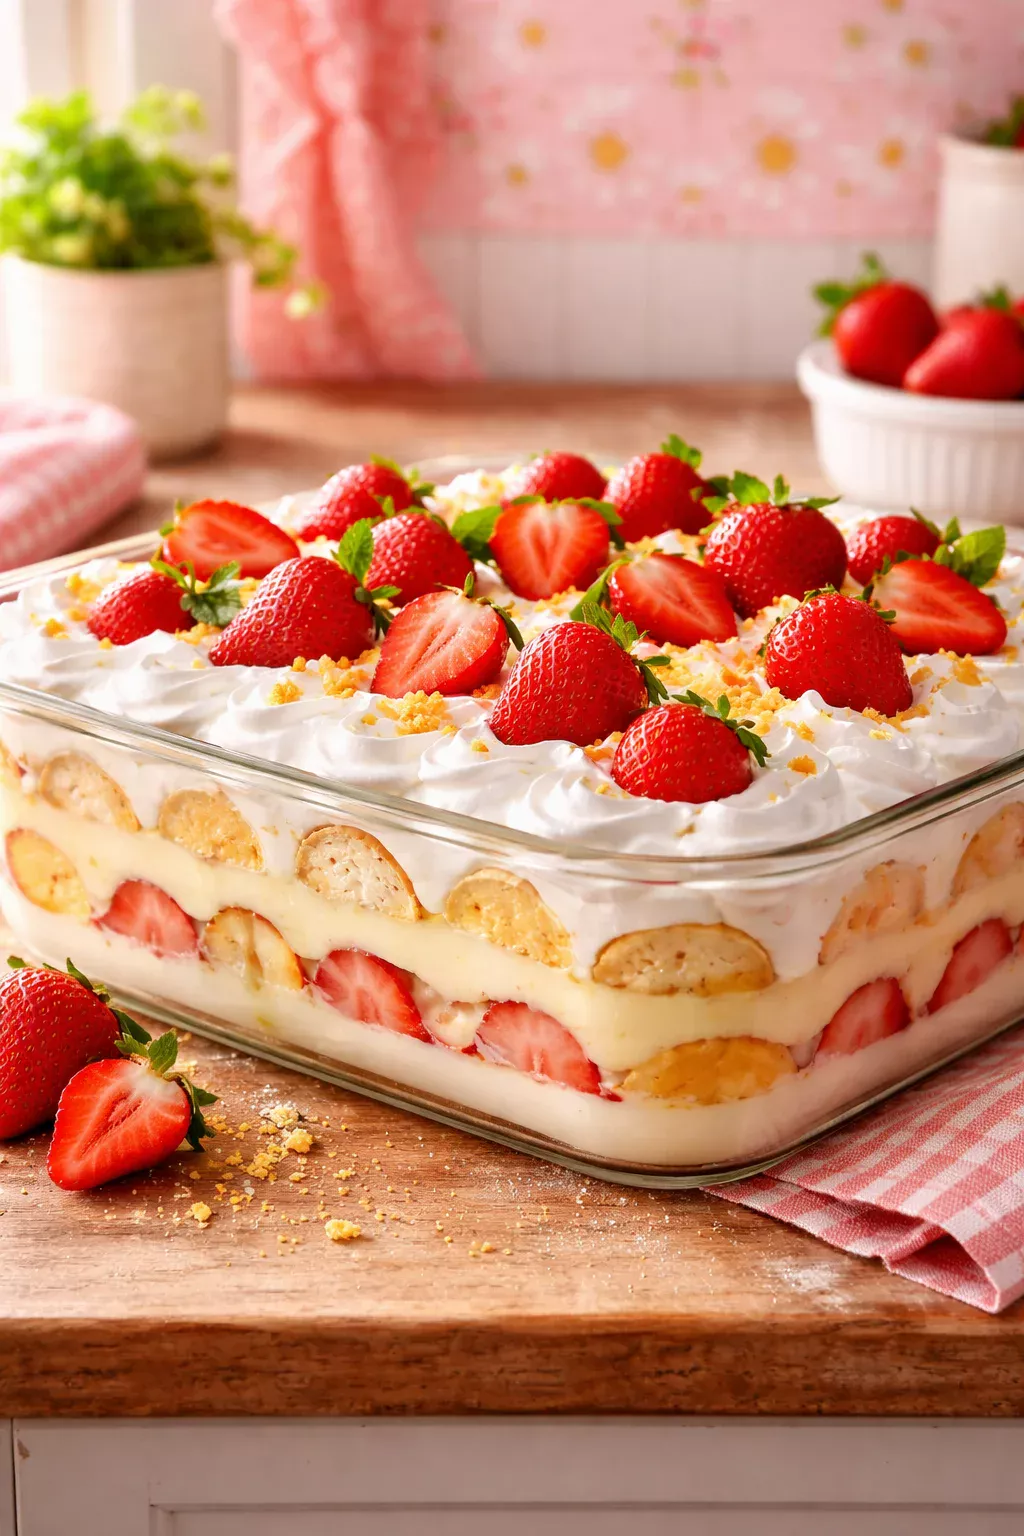
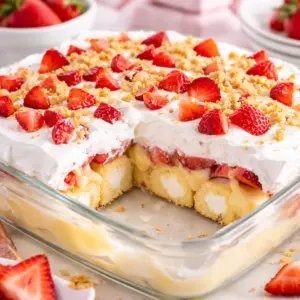
Let me paint the scene: soft snack cakes, fluffy pudding filling, and a cloud of whipped topping, all stacked into a chilled slice you can actually cut and serve. This TWINKIE CAKE! (No-Bake!) is sweet, simple, and honestly kind of impossible to mess up if you follow a few basics.
What you will need
- Twinkies (about 10 to 12, depending on your dish size)
- 1 box instant vanilla pudding mix
- Cold milk (use the amount listed on the pudding box)
- 1 tub whipped topping, thawed
- Optional but so good: sliced strawberries or bananas
- Optional: a drizzle of strawberry syrup or a sprinkle of crushed cookies
If you are the kind of person who likes to plan ahead, this is also a great time to peek at other easy dessert ideas on your site. I usually keep a short list of no stress sweets bookmarked, like quick no bake desserts for those last minute invites.
Simple step by step layering
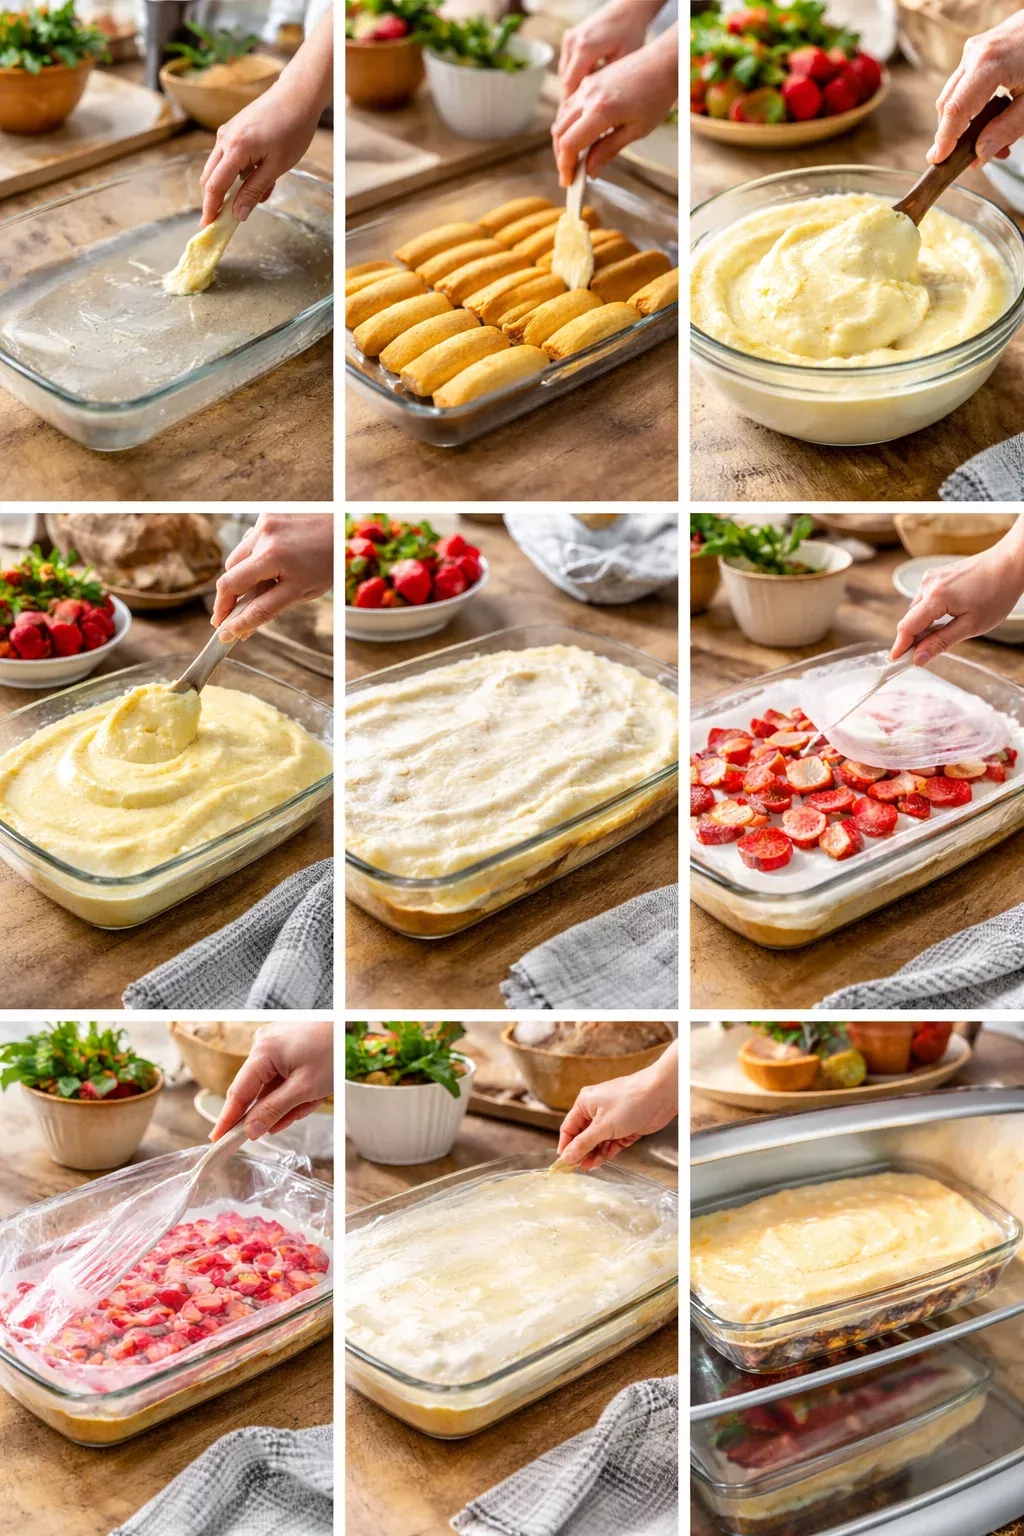
1) Grab a 9×13 dish or a similar sized pan. Lightly grease it if you want easier serving, but it is not required.
2) Slice the Twinkies in half lengthwise. Lay them cut side up in a single layer across the bottom of the dish. Fill gaps with smaller pieces if you need to.
3) In a bowl, whisk the instant pudding mix with cold milk until it thickens. This takes a couple minutes. Let it sit for another minute so it gets nice and set.
4) Fold in about half of the whipped topping. Do not overmix. You want it fluffy, not runny.
5) Spread that pudding mixture over the Twinkies. Go slow and gentle so you do not drag the cakes around.
6) Add a layer of fruit if you are using it. Strawberries are my favorite because they cut the sweetness a little.
7) Spread the remaining whipped topping over everything. Smooth it out like frosting.
8) Cover and refrigerate at least 4 hours, but overnight is even better. The Twinkies soften slightly and everything slices cleaner.
I cannot tell you how many times I have made this for a potluck and someone asked for the recipe before they even finished their piece. It is that kind of dessert. 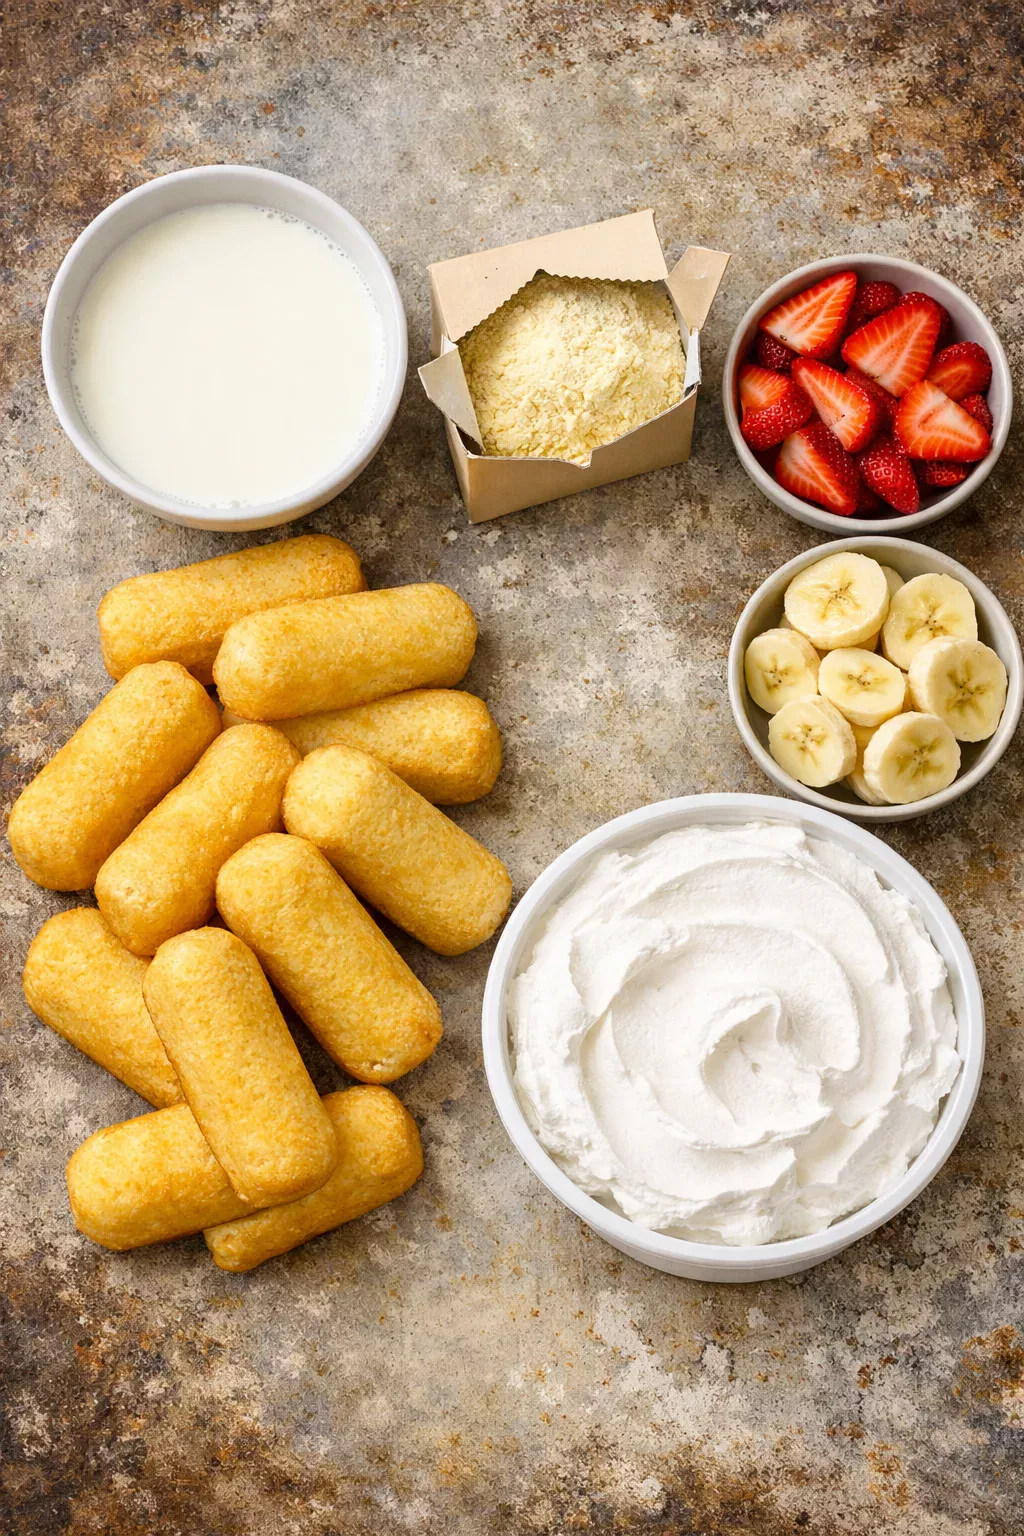
Recipe Notes
This section is basically everything I have learned the hard way, so you do not have to. The goal is a chilled cake that is soft but not soggy, and creamy but not soupy.
Use instant pudding, not cook and serve. Instant is what sets up quickly and keeps the texture light. Also, make sure your milk is cold. Warm milk makes pudding take forever to thicken, and then you are standing there whisking like it is an upper body workout.
If you are adding fruit, pat it dry first. Extra juice can make the top layer slide around. For strawberries, I slice them and lay them on a paper towel for a few minutes. Same idea for canned fruit, drain it very well.
Pan size matters. A 9×13 gives you a classic party size. If you use a smaller dish, you will have thicker layers, which is not a bad thing, just a different vibe. If you want to see more party friendly pan desserts, I also love keeping ideas like easy potluck desserts on hand.
“I made this for my daughter’s birthday dinner and it disappeared faster than the ice cream. My husband asked if we could keep the ingredients stocked like a pantry staple.”
One more thing: if you want that super clean slice, chill longer than you think. I know it is tempting to dig in early, but this is one of those desserts that rewards patience.
Storage Tips
This TWINKIE CAKE! (No-Bake!) is a fridge dessert through and through. It needs the cold to stay fluffy and sliceable.
In the refrigerator: Cover the dish tightly with plastic wrap or a lid. It will keep well for about 3 days. The Twinkies soften more over time, which some people love. By day three it is extra tender, kind of like a pudding cake.
Individual portions: If you know you will be grabbing slices throughout the week, cut it into squares and store in airtight containers. It is also a nice move if you are sending leftovers home with friends.
Can you freeze it? Sort of. You can freeze it, but the texture changes. The whipped topping can get a little icy and the cake can turn a bit spongy after thawing. If you still want to do it, freeze in individual portions, wrap well, and thaw in the fridge overnight. It is not quite the same, but it is still tasty.
For more make ahead sweets that sit well in the fridge, I keep a running list like make ahead desserts because future me is always grateful.
Variations of Twinkie Cake
The classic version is a keeper, but this is also one of those recipes that practically begs you to play around with it. Here are a few twists I have tried or tasted at family get togethers.
Strawberry shortcake style: Add sliced strawberries between layers and drizzle a little strawberry syrup on top. This one feels extra summery.
Banana cream pie vibe: Layer bananas over the pudding, then sprinkle crushed vanilla wafers on top right before serving.
Chocolate version: Use instant chocolate pudding instead of vanilla. Add mini chocolate chips on top. People go nuts for this.
Lemon bright and sunny: Use lemon instant pudding and add blueberries. It tastes like a picnic dessert.
Cookies and cream: Fold crushed chocolate sandwich cookies into the pudding mixture, then sprinkle more on top just before serving so they stay a little crunchy.
When you are swapping flavors, just keep the basic structure the same: Twinkies on the bottom, creamy layer in the middle, whipped topping on top. If you want another fun spin for warm weather, you might also like browsing something like summer no bake treats for extra inspiration.
Tips for Serving Twinkie Cake
This is the part where you can make it look a little fancy with almost zero effort. My favorite kind of fancy.
- Chill it long enough so it slices clean. Overnight is ideal.
- Use a sharp knife and wipe it between cuts for neat squares.
- Top each slice with fresh fruit right before serving for color and a fresh bite.
- If you want crunch, add crushed cookies or nuts at the last second so they do not get soft.
- Serve it cold, straight from the fridge. It is at its best that way.
If you are serving a crowd, you can also set out little toppings in bowls and let people decorate their own slice. It feels fun and keeps the whipped topping layer looking pretty longer.
Common Questions
Can I make this the night before?
Yes, and you probably should. This TWINKIE CAKE! (No-Bake!) gets better after a long chill because the layers settle and slice nicely.
Do Twinkies get soggy?
They soften, but I would not call it soggy if you keep fruit from being too wet. It turns into a tender cake like texture that is really nice.
Can I use homemade whipped cream instead of whipped topping?
You can, but it will be softer and may not hold as long. If you are serving it the same day, homemade whipped cream is great. For a party the next day, whipped topping is more stable.
What if I only have a smaller pan?
No problem. You will just have thicker layers. You may need fewer Twinkies, or you can trim them to fit.
How do I keep the top looking pretty?
Spread the whipped topping smoothly, then add any sprinkles or crushed cookies right before serving. If you add crunchy toppings too early, they will soften in the fridge.
A sweet little sign you should make this soon
If you want a dessert that feels playful, easy, and totally shareable, keep this one in your back pocket. TWINKIE CAKE! (No-Bake!) is all about simple layers, a good chill, and letting the fridge do the hard part. If you want to compare my approach with other fun takes, check out Twinkie Cake (No Bake Recipe) – Southern Plate and this fruity twist from No Bake Strawberry Twinkie Cake – Family Fresh Meals. Now go grab those Twinkies and a pudding mix, and give it a try the next time you need a no stress dessert that makes people smile.
Twinkie Cake
Ingredients
For the cake
- 10-12 pieces Twinkies Depending on your dish size
- 1 box instant vanilla pudding mix Use instant pudding, not cook and serve
- as needed cups cold milk Use the amount listed on the pudding box
- 1 tub whipped topping Thawed
Optional toppings
- as needed pieces sliced strawberries or bananas For added flavor
- as needed tablespoons strawberry syrup or crushed cookies For drizzling or sprinkling on top
Instructions
Preparation
- Grab a 9×13 dish or a similar sized pan. Lightly grease it if desired.
- Slice the Twinkies in half lengthwise and lay them cut side up in a single layer across the bottom of the dish.
- In a bowl, whisk the instant pudding mix with cold milk until it thickens, then let it sit for another minute.
- Fold in about half of the whipped topping, being careful not to overmix.
- Spread the pudding mixture over the Twinkies gently.
- If using fruit, add it between layers.
- Spread the remaining whipped topping over the entire cake and smooth it out.
Chilling
- Cover and refrigerate for at least 4 hours, preferably overnight.