
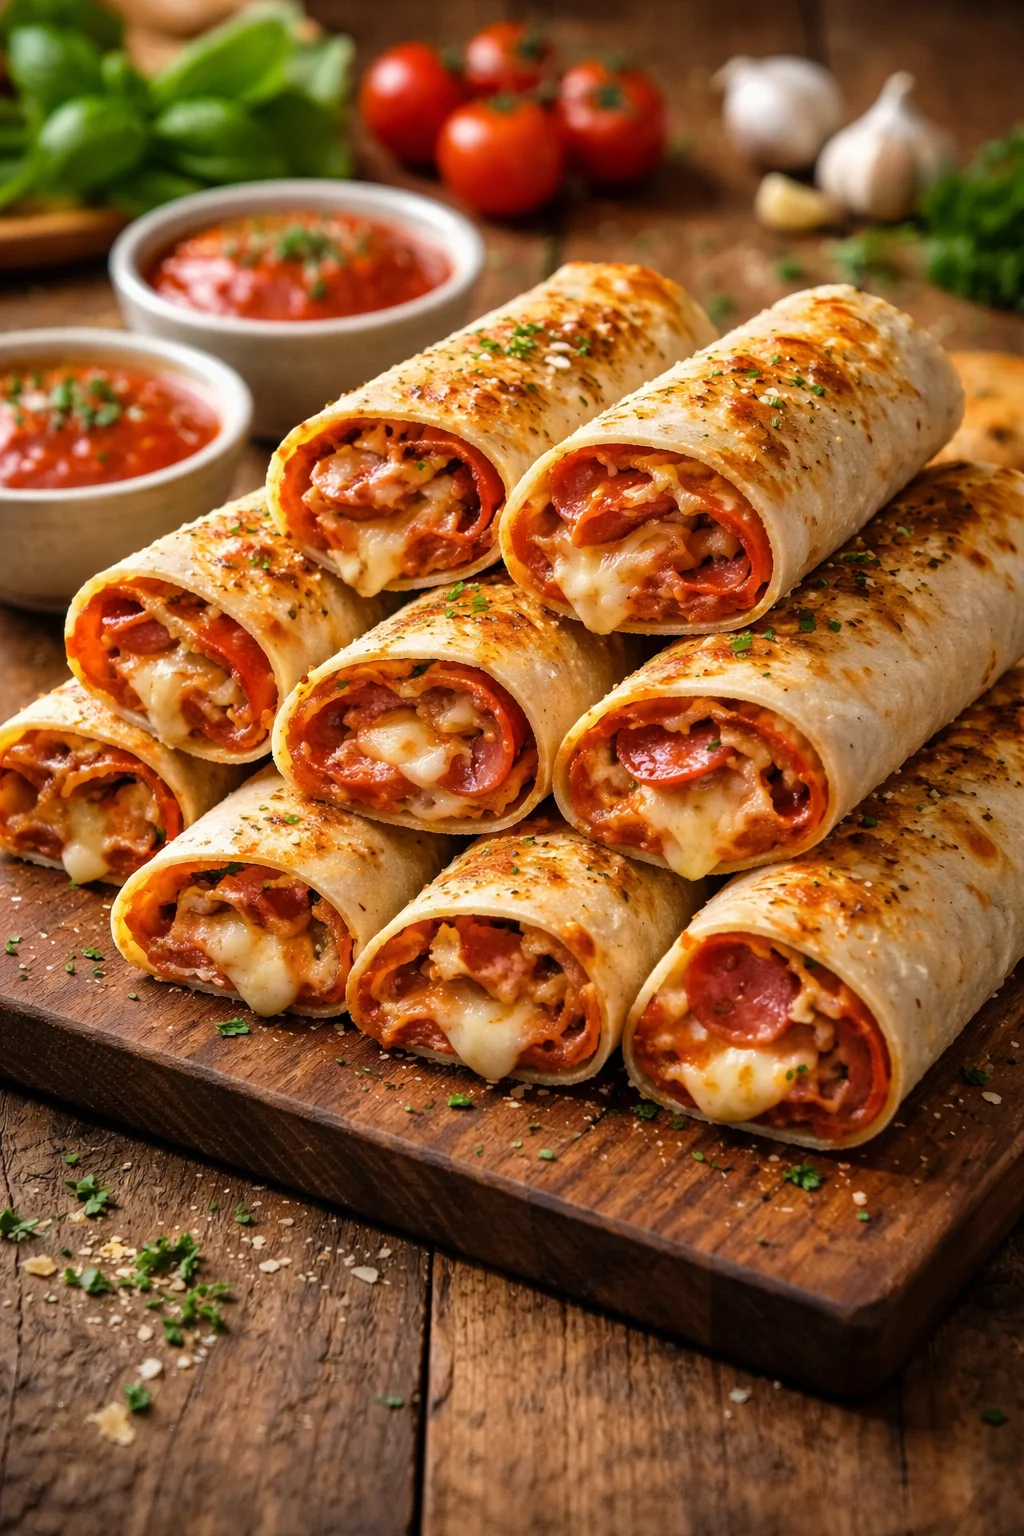
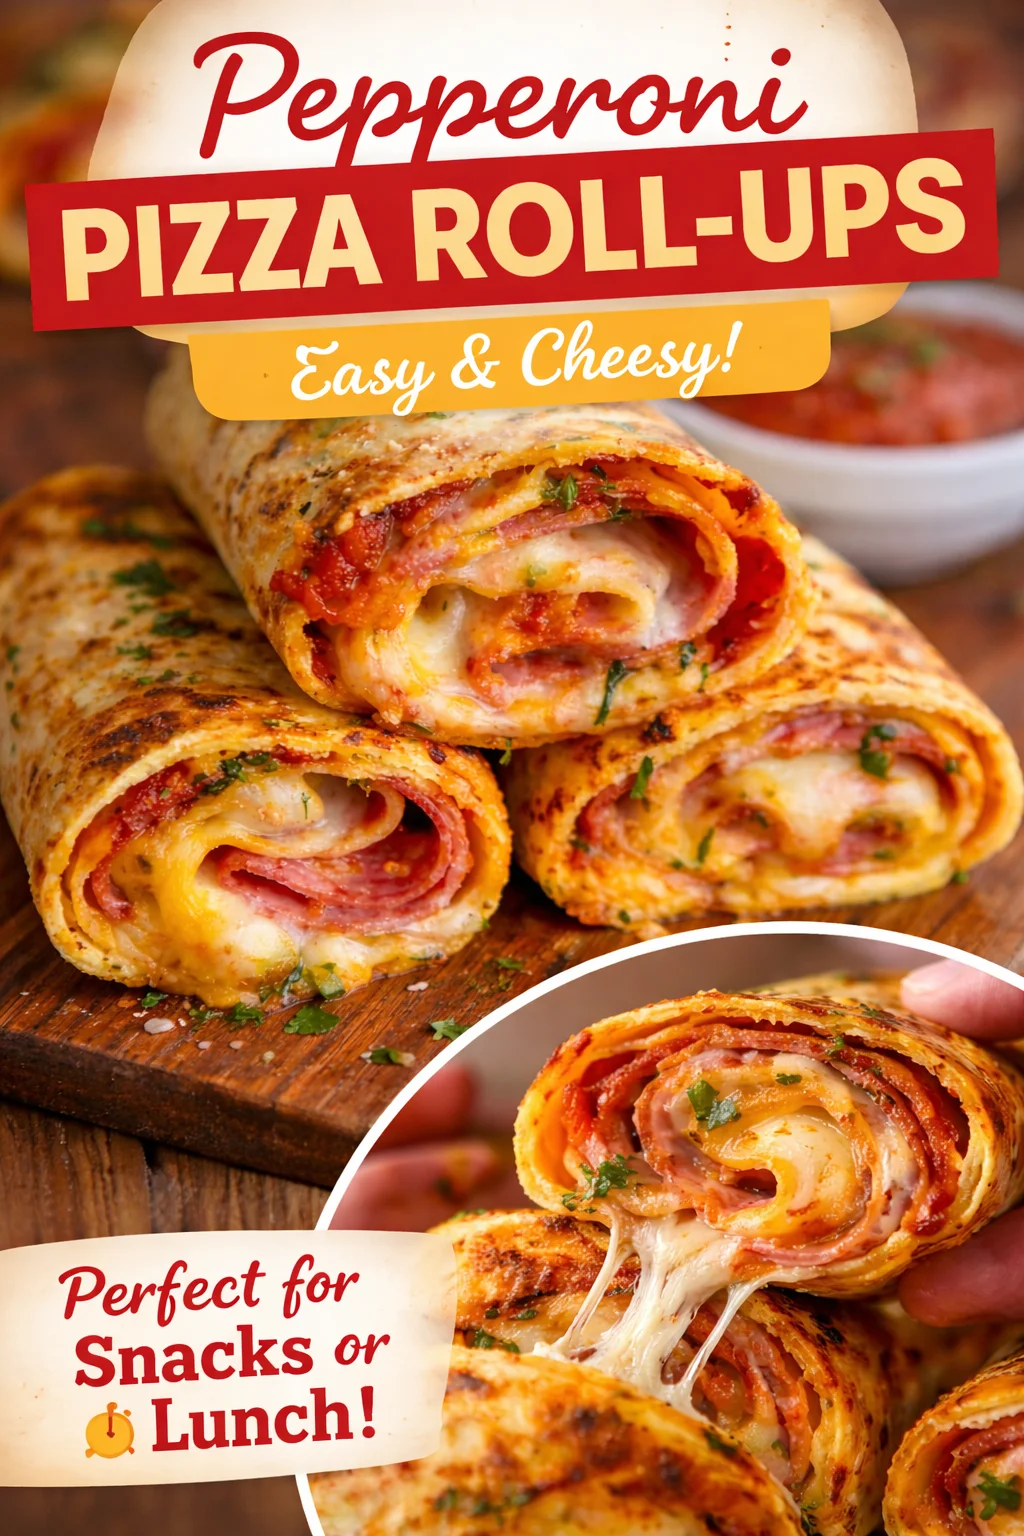
BAKED PIZZA WRAPS are my answer to those nights when everyone’s hungry, the fridge looks random, and ordering takeout feels like admitting defeat. I started making these when I wanted something pizza-ish but faster than making dough and less messy than a full pizza night. They’re crispy on the outside, warm and cheesy in the middle, and you can customize them for picky eaters without making separate meals. Plus, they bake up all at once, so you’re not standing at the stove flipping things. If you’ve ever wanted pizza you can hold in your hand, this is your moment.
What You’ll Need For Pizza Roll Ups
I call these pizza roll ups and wraps interchangeably because the vibe is the same. It’s pizza filling tucked into a wrap, rolled up, and baked until golden. The best part is how flexible it is. You can keep it classic pepperoni, go veggie, or do a fridge cleanout version and nobody complains.
Ingredients that actually work
Here’s what I usually grab. You do not need anything fancy, just a few basics that play nice together.
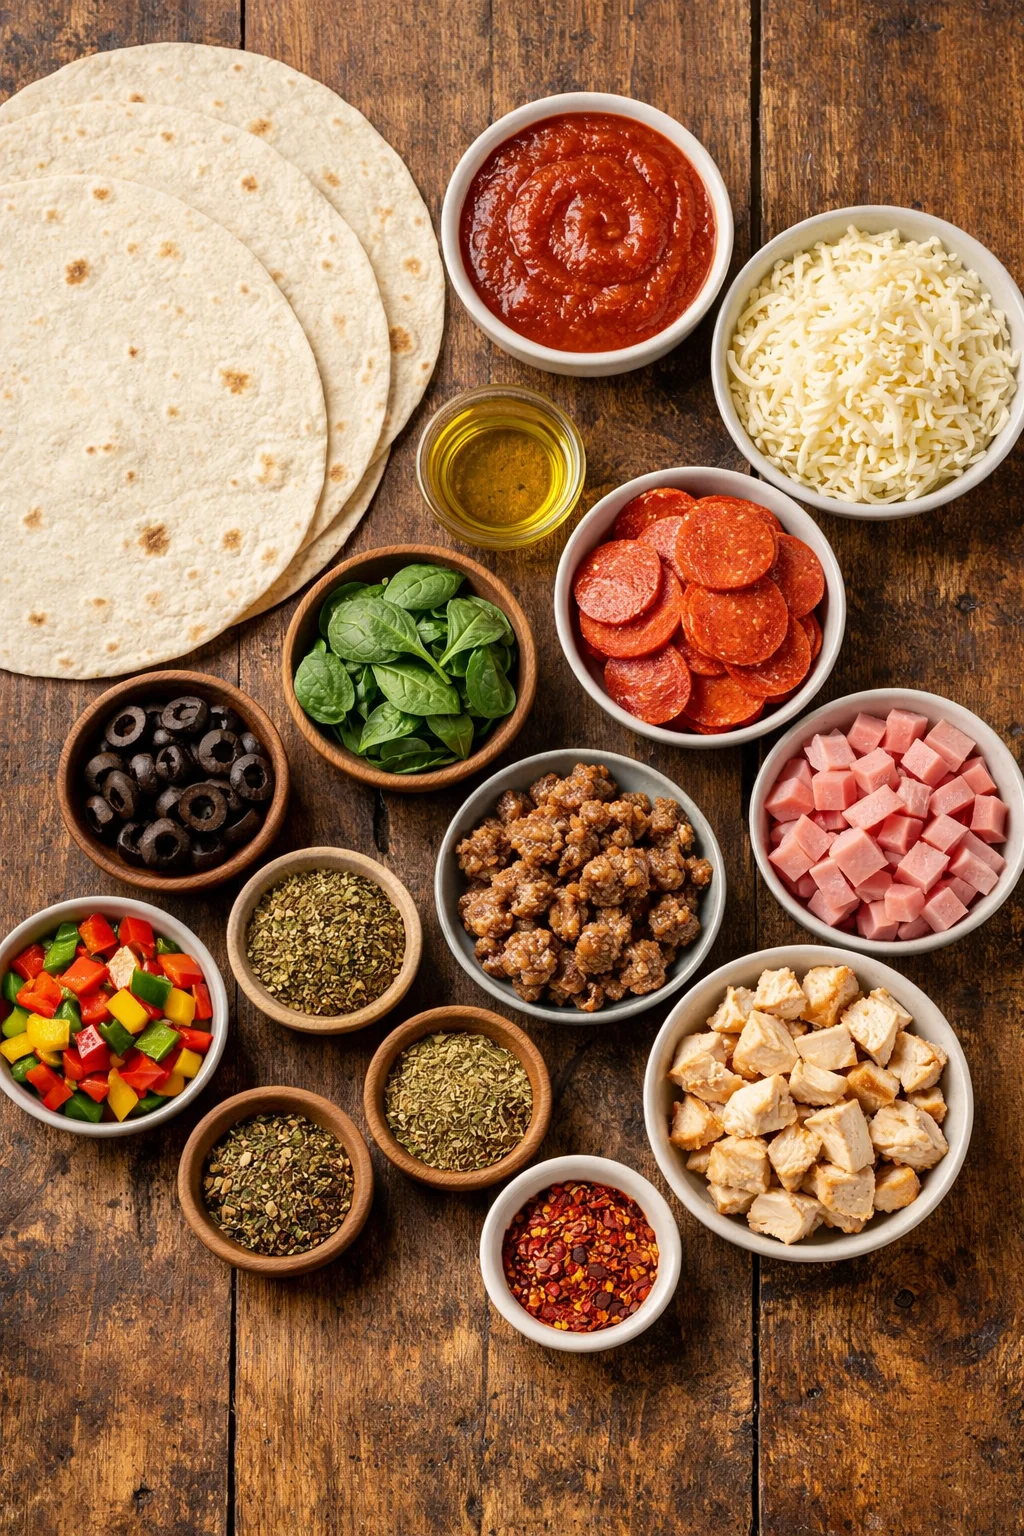
- Large flour tortillas (burrito size rolls best)
- Pizza sauce or marinara (about 2 to 3 tablespoons per wrap)
- Shredded mozzarella (the melty glue that holds happiness together)
- Pepperoni, cooked sausage, ham, or cooked chicken
- Optional add ins: sliced olives, diced bell pepper, mushrooms, spinach
- Italian seasoning or oregano
- Olive oil or melted butter for brushing
- Optional: parmesan for the top, and a pinch of garlic powder
If you need a wrap option that’s not the usual flour tortilla, I’ve tried a few swaps. For a simple homemade option, these 3-ingredient gluten-free wraps can be a great base. Just make sure whatever wrap you use can roll without cracking, because nobody wants the cheese to escape and weld itself to the baking sheet.
One more thing that helps: keep your fillings not too wet. If you pile in watery veggies, your BAKED PIZZA WRAPS can turn soft in the middle. I still add veggies, I just keep them light and sometimes quickly sauté mushrooms first.
“I made these for my kids’ movie night and they disappeared in ten minutes. Even my non-pizza kid ate two and asked for them in his lunchbox.”
How To Make Pizza Roll Ups
This is the part I love because it’s low stress. No kneading, no waiting, no drama. You just assemble, roll, bake, and suddenly you look like you had a plan all along.
Step by step, no fuss
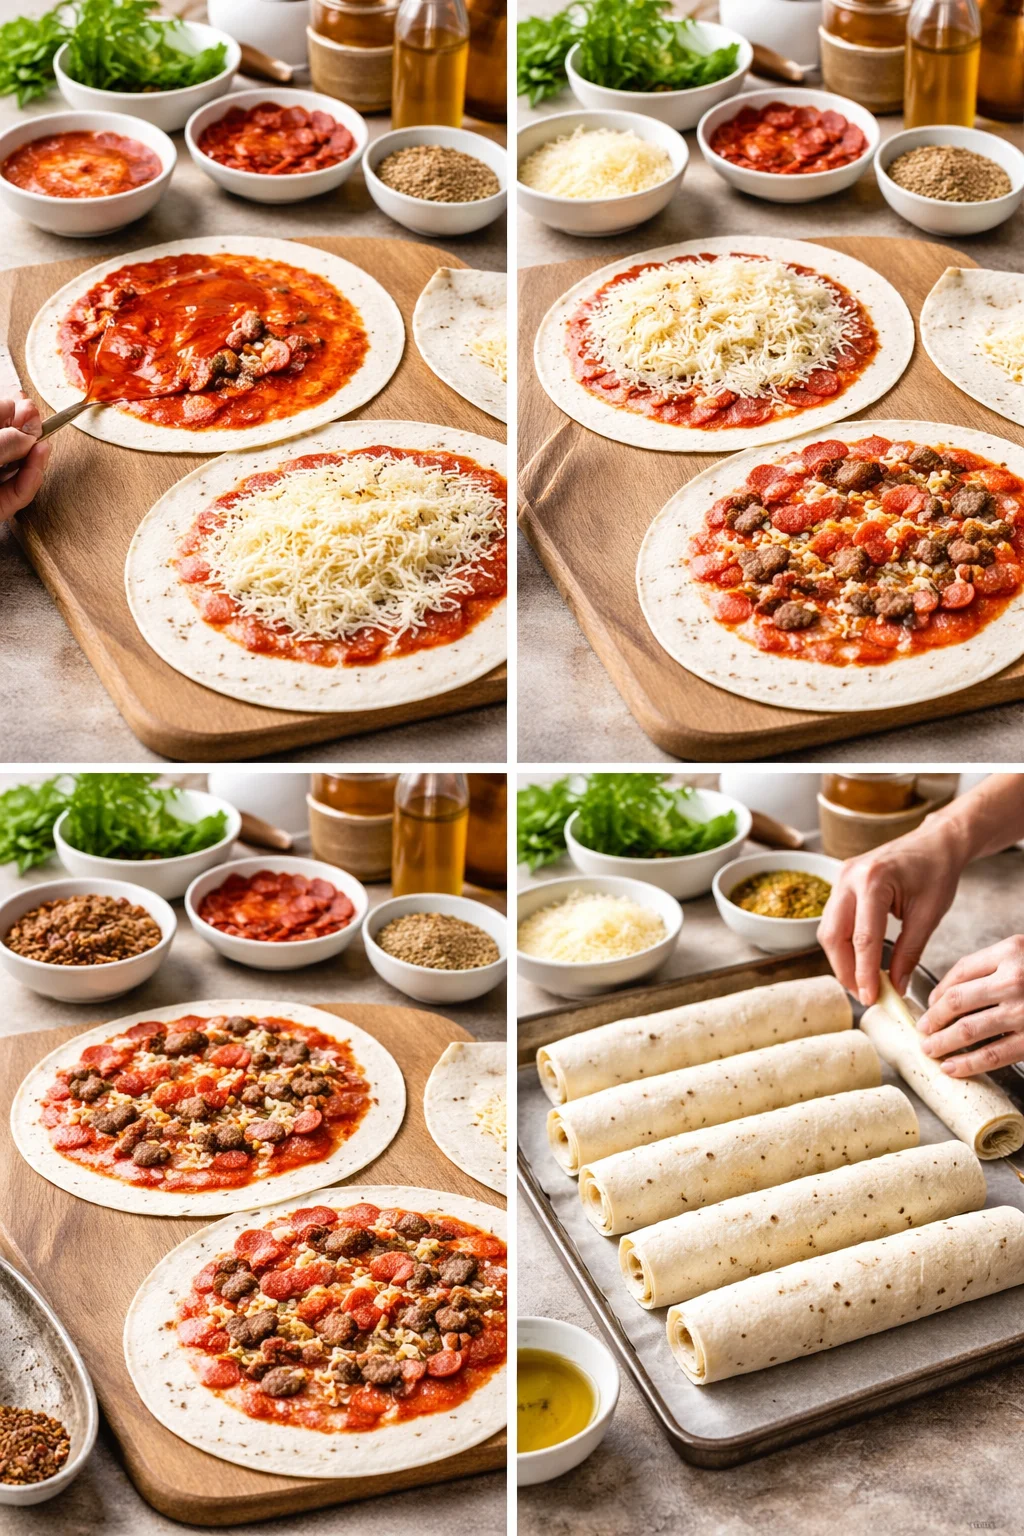
1) Preheat your oven to 400°F. Line a baking sheet with parchment paper or lightly grease it.
2) Lay out your tortillas. Spread pizza sauce on each one, but leave about an inch around the edges. If you go all the way to the edge, it squishes out when you roll.
3) Add mozzarella and toppings. My personal rule is: cheese first, then toppings, then a tiny sprinkle of cheese again. That extra bit helps “seal” the inside when it melts.
4) Sprinkle on Italian seasoning. If you like garlic, add a pinch of garlic powder too.
5) Roll them up tight like a burrito. Tuck in the sides a little if you can, then roll forward. Place seam side down on the baking sheet.
6) Brush the tops with olive oil or melted butter. This is what makes them bake up golden instead of dry. If you want, sprinkle parmesan on top.
7) Bake 12 to 15 minutes, until the tops look golden and the cheese inside is melted. If you want extra crisp, broil for 1 to 2 minutes at the end, but watch closely.
I like serving BAKED PIZZA WRAPS with warm marinara for dipping. Sometimes I do ranch too, and yes, I know that’s not “traditional,” but it’s delicious and that’s what matters on a Tuesday.
If you’re in a snacky pizza mood and want something bite sized, these crispy air fryer pizza rolls are also fun. Different texture, same cozy pizza energy.
Can I Make-Ahead?
Yes, and this is one of the reasons I keep coming back to BAKED PIZZA WRAPS. They’re super make-ahead friendly, which means future you gets an easy win.
Make-ahead options that still taste great
Option 1: Assemble earlier in the day
Roll them up, place seam side down on a tray, cover tightly, and refrigerate for up to 8 hours. When you’re ready, brush with oil or butter and bake as usual. You may need an extra 1 to 2 minutes if they’re cold.
Option 2: Bake, cool, and reheat
Bake them fully, let them cool, then refrigerate in a container. Reheat in the oven at 375°F for about 8 to 10 minutes. This keeps them crisp better than the microwave. The microwave works, but it softens the wrap.
Option 3: Freeze for later
You can freeze them baked or unbaked. I prefer freezing them baked because it’s easier to reheat. Wrap each one in foil, freeze, and then reheat in the oven still in foil at 375°F until hot, then unwrap for a few minutes to crisp the outside.
If you’re packing lunches, these also work cold in a pinch. I’m not saying they’re at their absolute best cold, but they’re still pretty good, especially if you kept the filling simple and not overly saucy.
For another make-ahead kind of meal that scratches the “wrapped and baked” itch, you might like these baked chicken chimichangas. Different flavor direction, same easy oven method.
More Italian-Style Recipes To Try
If you’re making BAKED PIZZA WRAPS, you’re probably in that Italian comfort food mood. Same. When I’m on that kick, I tend to rotate a few cozy favorites so dinner doesn’t feel repetitive.
On the side, a simple veggie always makes the meal feel more complete without adding a lot of work. This baked parmesan zucchini is an easy one. It’s cheesy, it’s quick, and it doesn’t require you to babysit a pan.
And if you want something that feels like a weekend treat but is still doable, I’m a fan of cheesy baked breads. This baked cheese pie Turkish cheese pide is the kind of thing that makes the kitchen smell amazing and gets everyone hovering near the oven.
More Easy Mid-Week Meals
I’m always collecting meals that don’t drain my energy. BAKED PIZZA WRAPS are in that category because they’re fast, flexible, and everyone can pick their own fillings. If you’re trying to build a little list of reliable weeknight options, here are a few ideas to keep in your back pocket:
Quick meal ideas that pair well with busy schedules
- Wrap style dinners where you can mix and match fillings
- Sheet pan sides you can toss in the oven at the same time
- Big batch cooking on Sunday that turns into easy lunches
Sometimes I do a potato side while the wraps bake, especially when I want something hearty. If you like crispy edges and soft centers, these air fryer baked garlic parmesan potatoes are worth trying on a different night.
Also, if you’re feeding someone who’s dairy-free or just wants a lighter wrap situation, I’ve made quick wraps like these 10-minute vegan burrito wraps dairy-free and they’re surprisingly satisfying for how fast they come together.
Common Questions
Do BAKED PIZZA WRAPS get soggy?
They can if you use too much sauce or wet toppings. Keep sauce to a thin layer, and if you’re adding mushrooms or spinach, use less or cook them down first.
What’s the best cheese to use?
Low moisture mozzarella melts the best. I also like mixing in a little provolone for extra flavor, but mozzarella is the main one.
Can I make them spicy?
Yes. Add crushed red pepper flakes, use spicy pepperoni, or drizzle a little hot sauce inside before rolling.
How do I keep them closed while baking?
Place them seam side down and roll them fairly tight. If your tortillas are stiff, warm them for 10 seconds in the microwave so they roll without splitting.
Can I cook them in an air fryer instead?
Usually yes, in batches. Air fry around 375°F for 6 to 8 minutes, seam side down, and check early since air fryers vary a lot.
A cozy dinner you will want on repeat
BAKED PIZZA WRAPS are one of those simple recipes that somehow feels like a treat, even though it takes almost no effort. You can keep them classic, make them healthier, or let everyone build their own and call it a win. If you want more pizza roll up inspiration, I really like this Family-Favorite Pizza Roll Ups (Video) (Easy Dinner Idea) for extra tips, and these Baked Pizza Taquitos – The BakerMama are another fun twist when you want something extra crunchy. Try them once and you’ll get why I keep tortillas and mozzarella on standby.

Baked Pizza Wraps
Ingredients
Main Ingredients
- 4 large large flour tortillas Burrito size rolls work best
- 2-3 tablespoons pizza sauce or marinara Spread on each tortilla
- 2 cups shredded mozzarella The main cheese for filling
- 1 cup pepperoni or cooked sausage, ham, or cooked chicken Choose one or mix
- 1 cup optional add-ins (sliced olives, diced bell pepper, mushrooms, spinach) Keep fillings light to avoid sogginess
Seasoning and Toppings
- 1 teaspoon Italian seasoning or oregano For seasoning the filling
- 2 tablespoons olive oil or melted butter For brushing the tops before baking
- optional parmesan cheese For sprinkling on top
- optional pinch garlic powder For added flavor if desired
Instructions
Preparation
- Preheat your oven to 400°F (200°C). Line a baking sheet with parchment paper or lightly grease it.
- Lay out your tortillas and spread pizza sauce on each, leaving about an inch around the edges.
- Add mozzarella and your choice of toppings. Follow the order: cheese first, then toppings, then a sprinkle of cheese.
- Sprinkle on Italian seasoning and a pinch of garlic powder if desired.
- Roll the tortillas tight like burritos and tuck in the sides, placing seam side down on the baking sheet.
- Brush the tops with olive oil or melted butter and sprinkle with parmesan if using.
- Bake for 12 to 15 minutes until golden and the cheese is melted. Broil for an additional 1 to 2 minutes for extra crisp, if desired.