
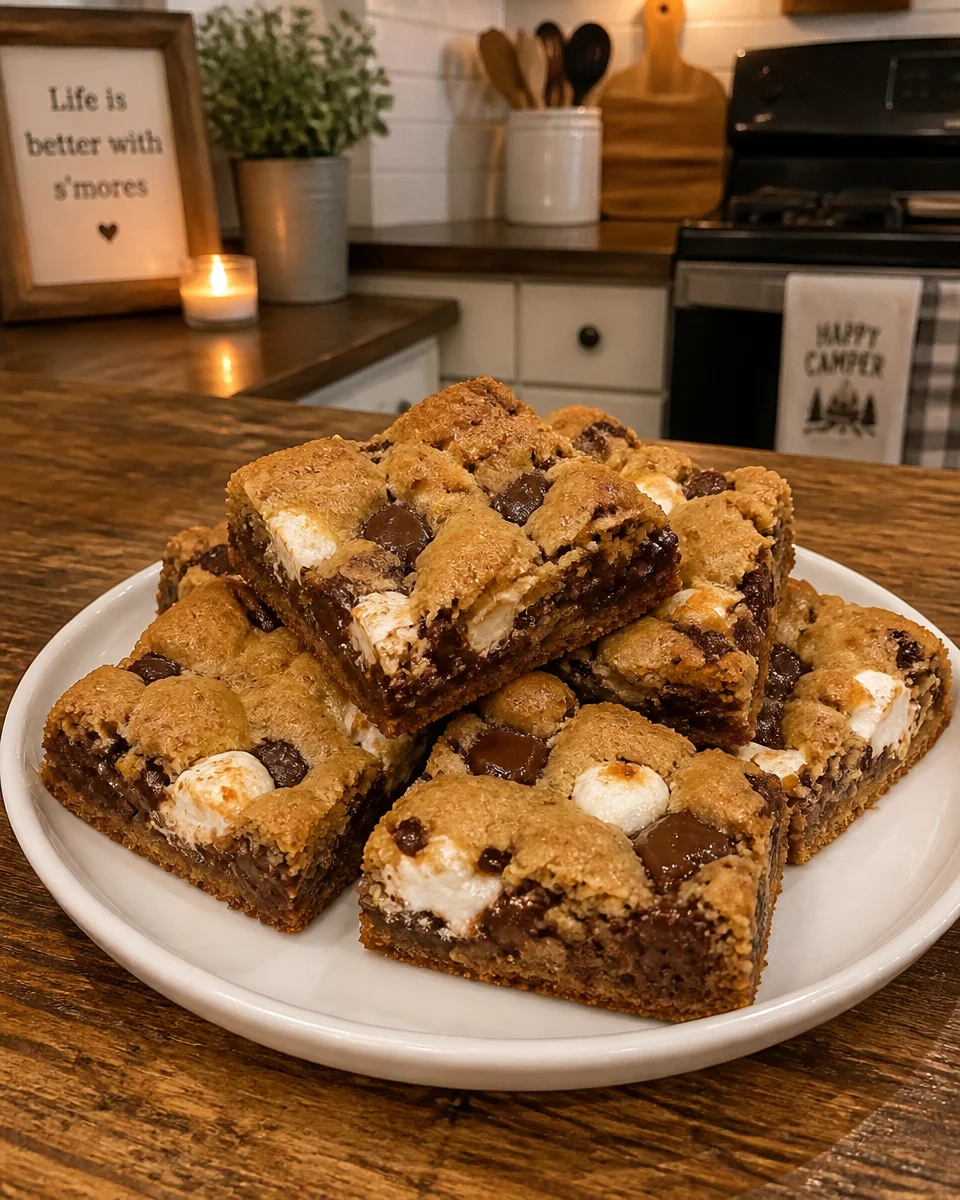
S’mores Cookie Bars are my go to fix when I want that campfire vibe but I am definitely not building a fire on a random Tuesday night. You know that feeling when you want something sweet, cozy, and a little nostalgic, but you also want it to be easy? These bars hit all of that. They are chewy like a cookie, gooey like a toasted marshmallow, and a little crunchy from the graham crackers. I started making them for movie nights, and now people ask for them like it is a tradition. If you have ever burned a marshmallow and still ate it anyway, this recipe is for you.
Key Ingredients for Smores Cookie Bars
The nice thing about these bars is that the ingredient list feels familiar. Nothing weird, nothing fancy. Just a few basics working together to make something that tastes like you put in way more effort than you did.
Here is what I use most of the time:
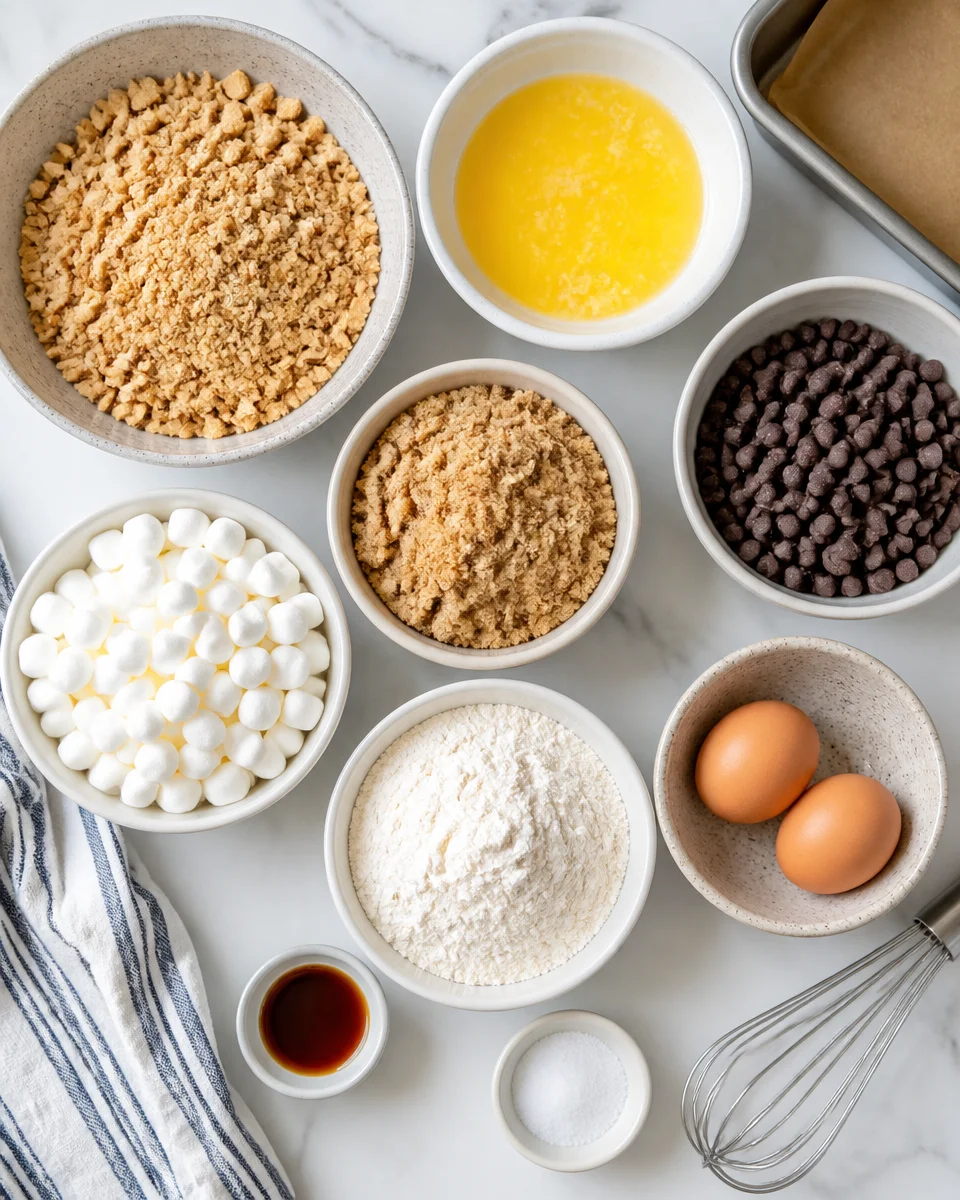
- Graham crackers: crushed for the base, plus a few bigger pieces if you like extra crunch.
- Butter: melted for the crust and softened for the cookie layer, depending on how you build yours.
- Brown sugar: gives that warm caramel flavor that makes the whole pan taste deeper and less one note sweet.
- Chocolate: I like milk chocolate for classic s’mores, but semisweet chips are great too.
- Marshmallows: mini marshmallows melt more evenly, but big ones cut in half also work.
- Flour: for the cookie bar structure.
- Eggs and vanilla: for binding and that bakery smell when it bakes.
- Salt: a small amount makes the chocolate and sugar taste better.
If you are the kind of person who loves bar desserts in general, you might also like these blackberry cheesecake bars for something fruity and creamy. They are different vibes, but the same easy, sliceable payoff.
A quick note on chocolate: you can totally use a chopped chocolate bar instead of chips. It melts into little puddles and looks extra tempting when you cut the bars. And if you want the marshmallow layer to feel really classic, try mixing minis with a few bigger marshmallows on top, so you get those stretchy pockets.
How to Make Smores Cookie Bars: Step-by-Step Guide
I make these in a standard 9 by 13 pan because I like a thinner bar that is easy to grab. If you want thicker bars, use a smaller pan and add a few minutes to the bake time.
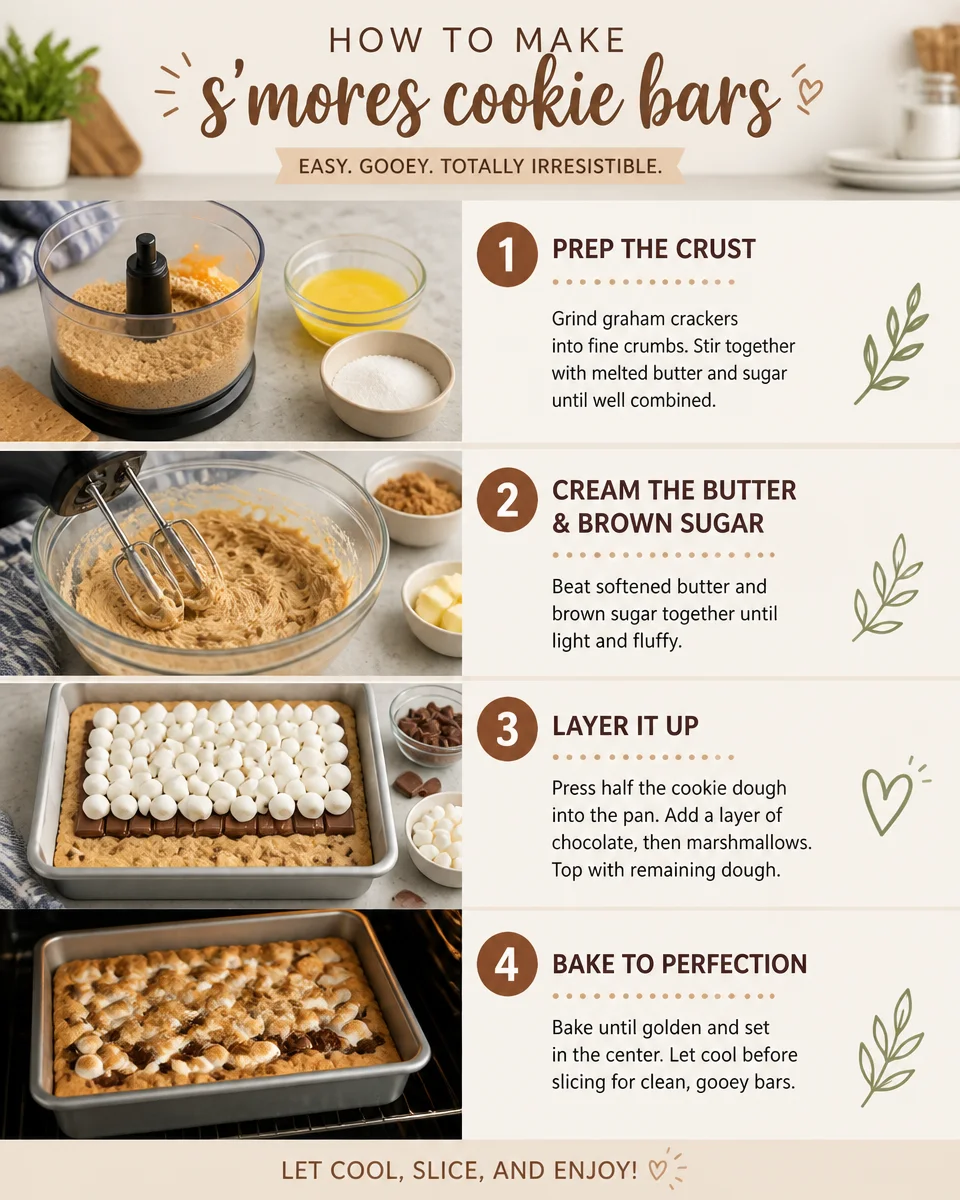
Step 1: Build the graham crust
Crush graham crackers into fine crumbs. I use a zip top bag and a rolling pin because it feels weirdly satisfying. Mix the crumbs with melted butter and a spoonful or two of sugar. Press it into your pan. I press with the bottom of a measuring cup so it is packed in and does not crumble when you slice.
Step 2: Mix the cookie layer
Cream butter and brown sugar until it looks fluffy. Add eggs and vanilla. Then stir in flour and salt just until you do not see dry flour anymore. Try not to overmix. You want chewy bars, not tough ones.
Step 3: Layer it up
Spread most of the cookie dough over the graham crust. It can be a little sticky, so I dot it around the pan and gently press it together. Then scatter chocolate over the top. Add a good layer of marshmallows. After that, I like to pinch off small bits of the remaining dough and drop them over the marshmallows. You do not need to cover everything. The gaps are where the marshmallows peek through and get all toasty.
Step 4: Bake and finish
Bake until the top looks golden and the edges are set. The center should still look a tiny bit soft because it keeps baking as it cools. If you want that extra toasted look on the marshmallows, you can broil for a very short time at the end. Like, stand there and watch it because marshmallows go from golden to scorched fast.
While you are in the mood for cookie style treats, I have to point you toward these apple pie cookies too. They are perfect when you want cozy spice flavors but still want something handheld.
“I brought these to a family get together and they disappeared before dinner even started. The marshmallow top was gooey and the graham crust actually stayed together. Everyone asked for the recipe.”
Essential Tips for Perfect Smores Bars
I have made these enough times to learn what matters and what does not. Here are my real life tips, the kind you only learn after you cut into a pan too early and the middle slides around.
Let them cool longer than you think. If you slice while they are hot, the chocolate and marshmallow layer will ooze everywhere. It will still taste great, but you will not get neat bars. I let them cool at room temp, then chill for 30 minutes if I want clean slices.
Use parchment paper if you can. It makes lifting the whole slab out of the pan so easy. Plus, less scrubbing later, which is always a win.
Do not skimp on the salt. Even just a half teaspoon in the dough keeps everything from tasting overly sweet. If you love that sweet and salty thing, add a tiny pinch of flaky salt on top after baking.
Marshmallow placement matters. If you pile marshmallows too high in one spot, that area can brown fast while other spots stay pale. Try to spread them out evenly. Then add a few extras right in the center because the edges naturally toast more.
Chocolate choice changes the whole vibe. Milk chocolate is classic. Semisweet feels more grown up. A mix is honestly the best of both worlds.
If you are into easy bars that feel a little special, you should also check out these sugar cookie cheesecake bars. They are sweet, creamy, and super shareable, like something you would bring to a party and immediately get invited back.
Storage and Serving Suggestions for Smores Cookie Bars
These bars are best the day they are made, but they still hold up well for a few days. The marshmallows soften over time, but honestly I kind of like that gooey chew.
How to store them:
- Room temperature: Keep in an airtight container for up to 2 days. Separate layers with parchment if they are sticky.
- Refrigerator: Up to 5 days. This gives you cleaner slices and a firmer bite.
- Freezer: Yes, you can freeze them. Wrap individual bars and freeze up to 2 months. Thaw at room temp.
My favorite ways to serve them: slightly warm with a glass of milk, straight from the fridge when I want them extra chewy, or cut into tiny squares for a dessert tray.
If you need another quick bar idea for a bake sale or a last minute dessert, these 4-ingredient carrot cake bars are a lifesaver. Simple ingredients, big reward. (Yes, I have made them when I was short on time and still wanted to show up with something good.)
Frequently Asked Questions about Smores Cookie Bars
Can I use marshmallow fluff instead of marshmallows?
You can, but it is messier. Fluff spreads and melts into the cookie layer, so you lose those toasted little domes on top. If you do use it, swirl it in and do not expect clean layers.
Why did my marshmallows disappear?
Usually they melted into the batter because they were buried too deep or the bars baked too long. Keep a good portion of marshmallows on the top surface and watch the bake time.
Can I make these gluten free?
Yes, with a 1 to 1 gluten free flour blend and gluten free graham crackers. The texture can be slightly more delicate, so cool them fully before cutting.
What is the best chocolate for a classic taste?
Milk chocolate bars or milk chocolate chips will taste the most like a traditional campfire s’more. If you like it less sweet, go with semisweet.
How do I cut them without a sticky mess?
Chill the pan for 30 to 60 minutes, then use a sharp knife. Wipe the blade between cuts. It feels extra, but it works.
A sweet, cozy ending
If you have been craving something fun, nostalgic, and easy to share, S’mores Cookie Bars really are the move. You get the crunchy graham base, the chewy cookie layer, and that gooey toasted marshmallow top all in one bite. I love making S’mores Cookie Bars for movie night, parties, or just because the week needs a little treat. If you want another solid version to compare techniques, I have also used tips from S’mores Cookie Bars (Recipe + Video) – Sally’s Baking Addiction, especially when I am in the mood to double check bake times. Go make a pan, let them cool (I know, it is hard), and tell me if you can stop at one.


S’mores Cookie Bars
Ingredients
For the crust
- 1 cup crushed graham crackers For the base, plus a few bigger pieces if you like extra crunch
- 1/2 cup butter, melted For the crust
- 2 tablespoons sugar For mixing with graham cracker crumbs
For the cookie layer
- 1/2 cup butter, softened For the cookie layer
- 1 cup brown sugar Gives a warm caramel flavor
- 2 large eggs For binding
- 2 teaspoons vanilla extract For bakery aroma
- 1 cup all-purpose flour For the cookie structure
- 1/2 teaspoon salt To enhance flavor
For the filling
- 1 cup chocolate chips Milk chocolate preferred, but semisweet is also great
- 2 cups mini marshmallows Melt evenly, but halved big marshmallows also work
Instructions
Prepare the crust
- Crush graham crackers into fine crumbs and mix with melted butter and sugar.
- Press the mixture into a 9×13 inch pan using the bottom of a measuring cup.
Make the cookie layer
- Cream softened butter and brown sugar until fluffy.
- Add eggs and vanilla, then stir in flour and salt until just combined.
Layer the ingredients
- Spread most of the cookie dough over the graham crust.
- Scatter chocolate chips on top and add marshmallows.
- Pinch off small bits of remaining cookie dough and drop over the marshmallows.
Bake
- Bake in a preheated oven until the top is golden and the edges are set, approximately 25 minutes.
- If desired, broil for a short time for toasted marshmallows.