
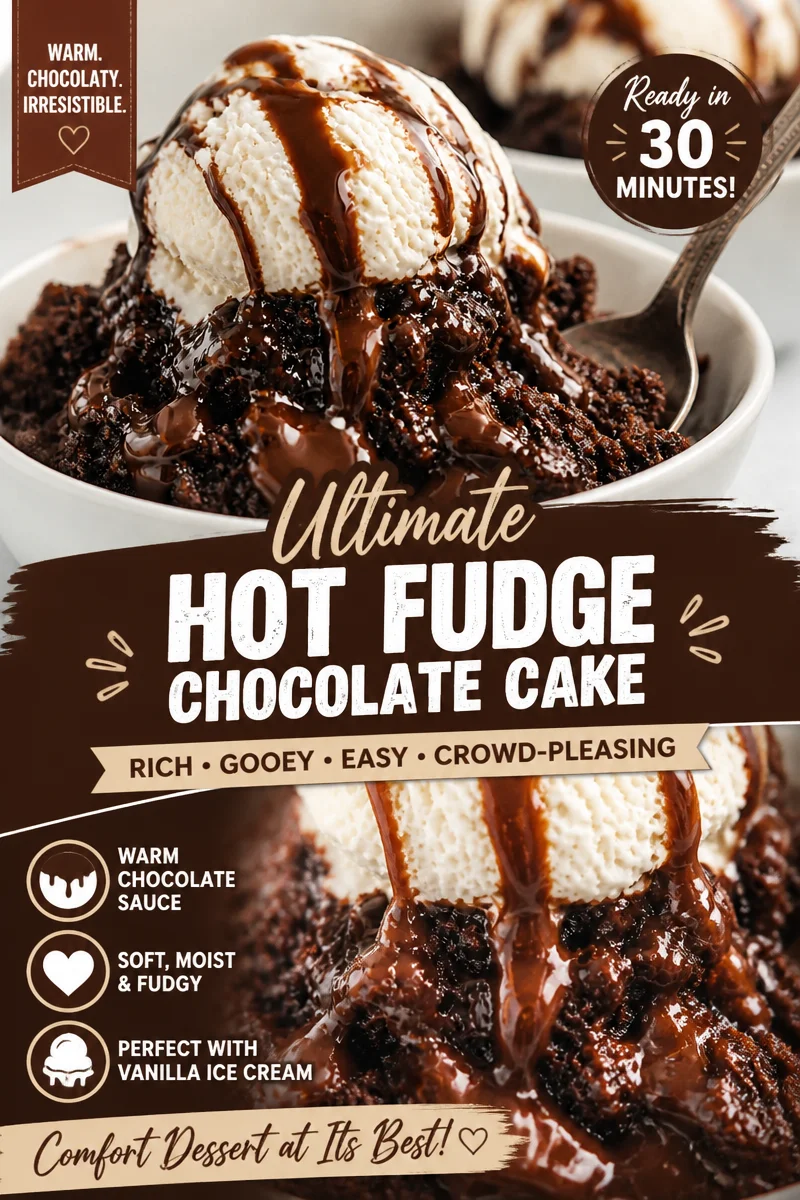
Chocolate Dump Cake is my go to dessert for those days when you want something warm, chocolatey, and comforting but you do not want a sink full of dishes. You know the feeling, you promised something sweet for after dinner, everyone is hinting for dessert, and you are already tired. This is the kind of recipe that makes you look like you tried really hard, even though you barely did. It bakes up rich and gooey in the middle with crisp, buttery edges, and the smell alone can pull people into the kitchen. If you have a box of cake mix and a couple pantry staples, you are basically set.
What is a Dump Cake?
A dump cake is exactly what it sounds like, and I mean that in the best way. You “dump” ingredients into a baking dish in simple layers, then bake. No mixer, no fancy steps, and usually no bowl at all unless you want to melt butter or warm something up.
The texture is not like a fluffy layer cake. It is more like a hybrid between a brownie, a cobbler, and a pudding cake. The bottom gets saucy, the top gets a little crisp, and you end up with this spoonable dessert that feels cozy and homemade.
I also love dump cakes because they are forgiving. If you are short on an ingredient, you can usually swap something in. If you accidentally scatter the cake mix unevenly, it still works out. And if you are in a “make it chocolate” mood, you can easily go full chocolate on chocolate.
If you are a dump cake person already, you might also like a bright, tangy option like this lemon dump cake for days when you want something lighter.
;
How to Make a Chocolate Dump Cake
This is the part where I tell you what I actually do at home. I have made this for last minute guests, for movie nights, and for that random Wednesday when I just needed a win. It is simple, but the details matter a little, especially with how you add the butter.
Ingredients and what you will need
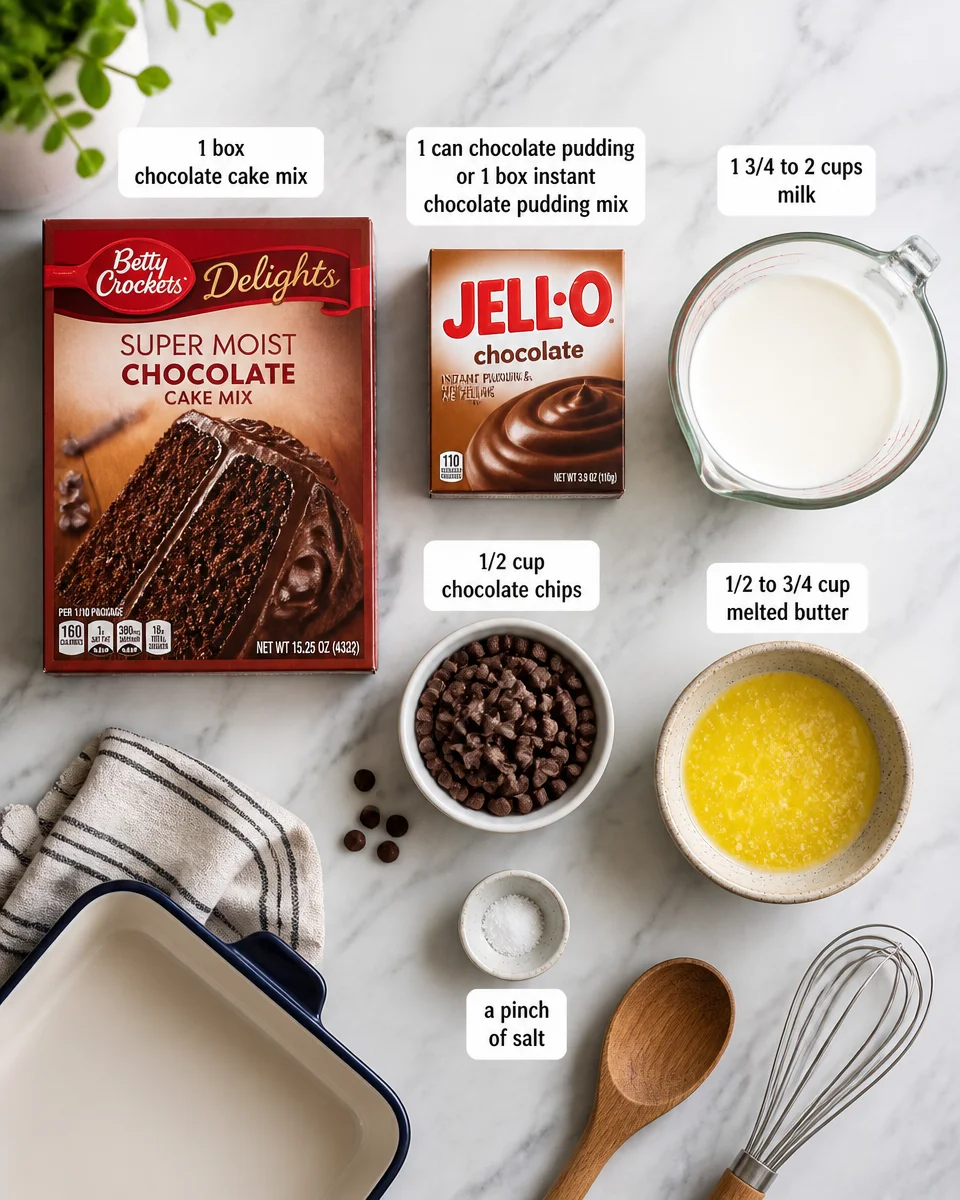
- 1 box chocolate cake mix (devils food is extra good here)
- 1 can chocolate pudding or 1 box instant chocolate pudding mix (either works, see notes below)
- 1 3/4 to 2 cups milk (or half and half for a richer result)
- 1/2 cup chocolate chips (optional but highly recommended)
- 1/2 to 3/4 cup butter, melted (amount depends on how buttery you like the top)
- Pinch of salt (especially helpful if your mix is very sweet)
- 9×13 baking dish, spoon, and measuring cup
If you are the type who loves classic cakes too, keep this bookmarked for later: classic chocolate cake. That one is more of a traditional slice-and-serve vibe, while this one is a scoop-and-swoon situation.
Directions (my no stress method)
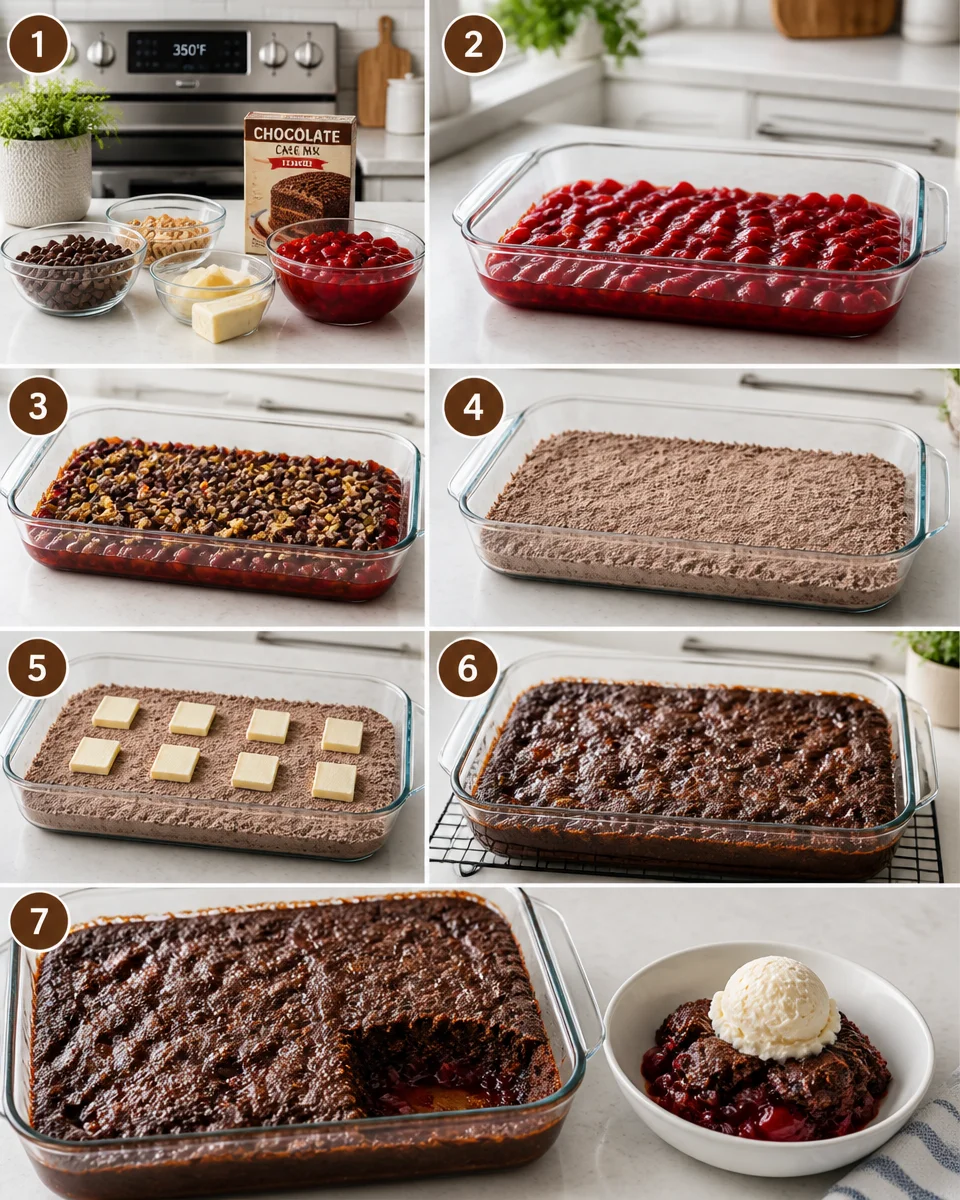
- Preheat your oven to 350 F. Lightly grease your 9×13 dish.
- In the baking dish, whisk together the pudding and milk. If you are using canned pudding, just stir it smooth with the milk until it loosens up.
- Sprinkle the dry chocolate cake mix evenly over the pudding layer. Try to cover the whole surface.
- Scatter chocolate chips over the top if you are using them.
- Pour melted butter all over the top. I aim for as even as possible, but I do not stress about it.
- Bake for about 35 to 45 minutes. The edges should look set and slightly crisp, and the center should look glossy but not raw.
- Let it cool for at least 15 minutes before scooping. It thickens as it sits.
That is it. The magic is that you do not stir the cake mix into the pudding. It bakes into layers all on its own.
When I want to really lean into that molten chocolate feeling, I sometimes make this and also plan a future night for slow cooker chocolate lava cake. Different method, same cozy chocolate payoff.
“I made this Chocolate Dump Cake for my kids on a rainy night and we ate it warm with vanilla ice cream. It was gone in minutes and my husband asked me to save the recipe. It is officially in our repeat rotation.”
Storage Tips for Chocolate Dump Cake
Chocolate Dump Cake stores better than you would think, which is great because sometimes you want a little scoop the next day with coffee. Once it cools, cover the baking dish tightly with foil or transfer leftovers to an airtight container.
Here is how I handle it:
Room temperature: If your kitchen is cool and you plan to finish it the same day, it can sit out for a few hours, loosely covered.
Refrigerator: Store for up to 4 days. The texture gets more fudgy once chilled.
Freezer: Yes, you can freeze it. Scoop portions into containers and freeze up to 2 months. Thaw overnight in the fridge.
Reheating: My favorite way is the microwave. A single serving usually needs 20 to 35 seconds. If you want the edges a bit crisp again, warm it in the oven at 300 F for about 10 minutes.
If you are into make ahead desserts that still feel a little special, you may also like cheesecake in a jar since it is portioned and easy to grab from the fridge.
Variations of Chocolate Dump Cake
Once you make the base version, it is hard not to start riffing. Here are a few variations I have tried or served at get togethers. The best part is you can keep the “dump” spirit but change the flavor.
Peanut butter chocolate: Add dollops of peanut butter on top of the pudding layer before the cake mix. Or scatter peanut butter chips with the chocolate chips.
Cherry chocolate: Add a can of cherry pie filling on the bottom, then pudding, then cake mix. It is messy in the best way.
Mint chocolate: Use mint chocolate chips or add 1/2 teaspoon peppermint extract to the milk and pudding mixture. Go easy, mint can get strong fast.
Mocha: Replace 1/2 cup of the milk with cooled coffee. It makes the chocolate taste deeper, not coffee-ish.
Extra rich: Swap some milk for evaporated milk, or do half and half. If you are a condensed milk fan, you would probably enjoy condensed milk chocolate cake too.
And if you want a dump dessert that is more fruity and tropical, pineapple dump cake is a fun change of pace.
Top Tips for Perfecting Your Dump Cake
I have made Chocolate Dump Cake enough times to learn a few small things that make a big difference. None of these are hard, but they help you avoid dry patches and make the texture more consistent.
My best practical tips
1. Spread the cake mix evenly. Dry pockets usually happen when the cake mix piles up in one spot. I sprinkle it slowly and try to cover the edges.
2. Do not skimp on butter coverage. Butter is what moistens the dry mix on top. If you see obvious dry powder after adding butter, drizzle a little more melted butter or even a splash of milk over those spots.
3. Let it rest before serving. Right out of the oven it can look too loose in the middle. Give it 15 to 20 minutes and it thickens into that gooey, scoopable texture.
4. Add a pinch of salt. It sounds tiny, but it makes the chocolate taste bigger and less one note sweet.
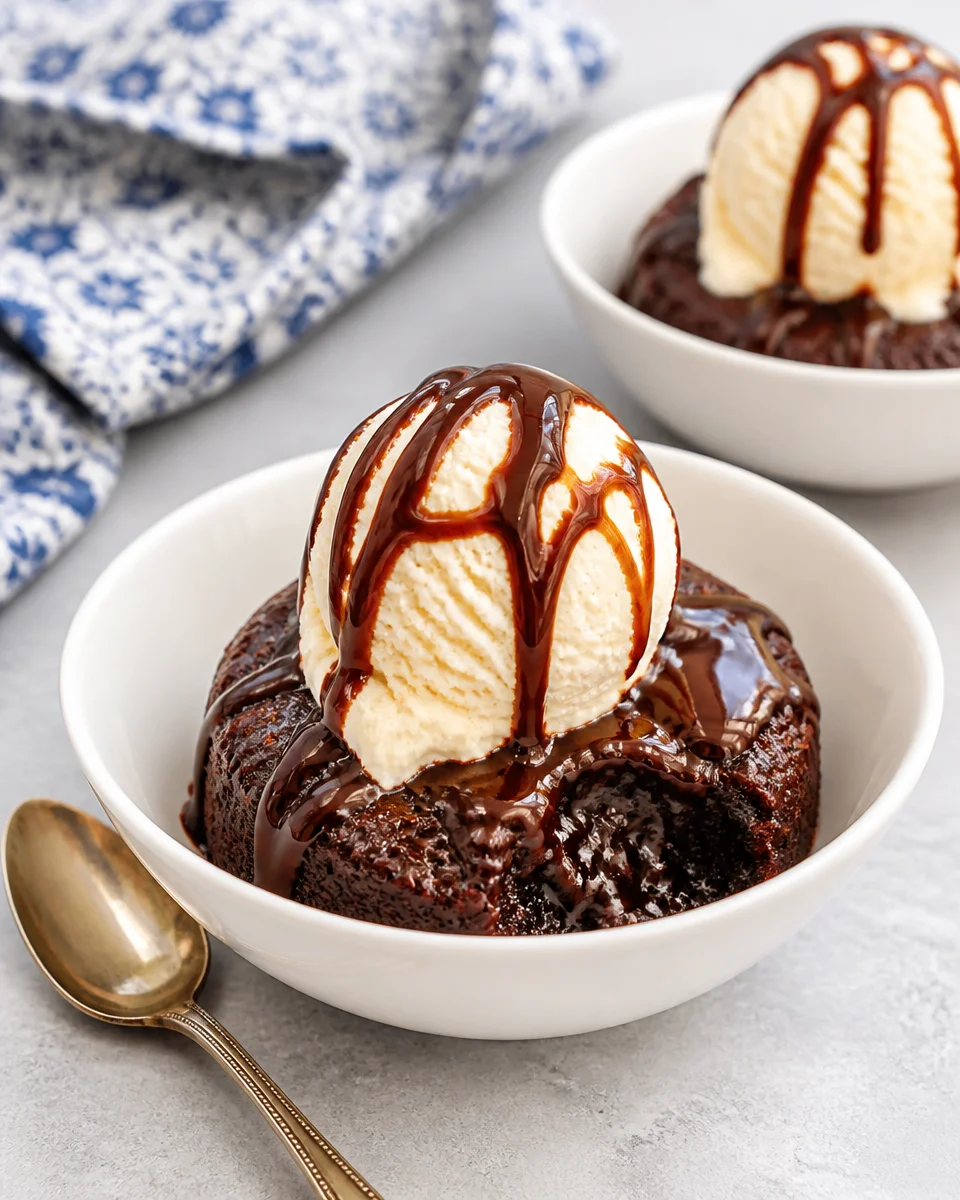
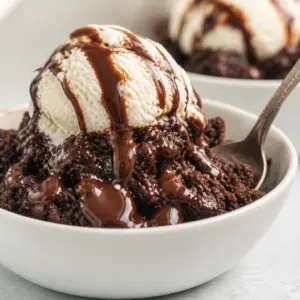
5. Serve it warm with something cold. Vanilla ice cream is classic. Whipped cream is great too. Even a spoonful of Greek yogurt works if that is what you have.
If you are experimenting with chocolate desserts but want something that is also lighter on carbs, I have had good luck with this one: low carb no bake chocolate cheesecake. Different vibe, but it hits that chocolate craving.
Common Questions
Do I really not mix anything?
Yep, that is the whole point. Layer it and bake it. The only thing you might mix is pudding and milk so it spreads easily.
Why is my top still powdery in places?
Usually the butter did not reach that area. Next time, pour butter more slowly and evenly. You can also spot fix with a small drizzle of melted butter, then bake 5 more minutes.
Can I use brownies instead of cake mix?
I would not for this specific method. Brownie mix behaves differently and can bake up odd and dry on top. Stick with chocolate cake mix for the classic Chocolate Dump Cake texture.
How do I know when it is done?
The edges should be set and pulling slightly from the sides. The center should look glossy and thick, not wet like raw batter. It will firm up as it cools.
What is the best way to serve it for guests?
Bake it in a nice dish, let it rest, then scoop into bowls. Put out ice cream, whipped cream, and extra chocolate chips so people can top their own.
A sweet ending and a little nudge to try it
If you have been needing a low effort dessert that still feels like a treat, Chocolate Dump Cake is the one I would bet on. It is simple, cozy, and really hard to mess up, which is honestly what I want most nights. If you want to compare methods or see other takes, I have enjoyed reading Easy Chocolate Dump Cake – Snappy Gourmet and also The Chocolate Dump Cake My Family Can’t Stop Eating because they both have great little tips. Make it once, keep the ingredients on hand, and you will always have a quick dessert trick up your sleeve. Tell me what mix ins you tried because I am always looking for a new excuse to make another pan.
Chocolate Dump Cake
Ingredients
Main Ingredients
- 1 box chocolate cake mix Devil’s food is extra good here
- 1 can chocolate pudding Or use 1 box instant chocolate pudding mix
- 1.75 to 2 cups milk Or half and half for a richer result
- 1/2 cup chocolate chips Optional but highly recommended
- 1/2 to 3/4 cup butter, melted Amount depends on how buttery you like the top
- 1 pinch salt Especially helpful if your mix is very sweet
Instructions
Preparation
- Preheat your oven to 350 F. Lightly grease your 9×13 dish.
- In the baking dish, whisk together the pudding and milk. If using canned pudding, just stir it smooth with the milk until it loosens up.
- Sprinkle the dry chocolate cake mix evenly over the pudding layer.
- Scatter chocolate chips over the top if using.
- Pour melted butter all over the top, aiming for as even coverage as possible.
Baking
- Bake for about 35 to 45 minutes. The edges should look set and slightly crisp, while the center should look glossy but not raw.
- Let it cool for at least 15 minutes before scooping.