
Cheesecake in a Jar is my little secret weapon for when I want a dessert that feels fancy but doesn’t wreck my kitchen. You know those nights when you’re tired, the sink is already full, and you still want something sweet that tastes like you tried? This is that dessert. It’s creamy, cool, and you can make it ahead, then just grab one from the fridge like a treat you left for your future self. Also, everyone loves getting their “own” dessert in a cute jar.
Why Youll Love Individual No-Bake Cheesecake Jars
I’ve made these for last minute guests, movie nights, and even as a “just because it’s Tuesday” dessert. They always get the same reaction: wide eyes, happy silence, then someone asking if there are more in the fridge.
Here’s why they work so well:
- No oven needed, which is a lifesaver in summer or when you just don’t feel like baking.
- Portion friendly so you can make a few, or a bunch, without slicing and serving drama.
- Make ahead so dessert is handled before anyone even asks what’s for dessert.
- Easy to customize with different crumbs, fillings, and toppings depending on your mood.
And honestly, I love that it’s a dessert that travels well. Screw on a lid, toss it in a cooler, and you’ve got a picnic ready sweet.
If you’re planning a quick meal and want a simple dessert right after, I pair these jars with easy recipes like 10-minute air fryer chicken sausage and veggies because it keeps the whole night low stress.
“I made these for a family get together and they were the first dessert gone. My sister asked for the recipe before she even finished her jar.”
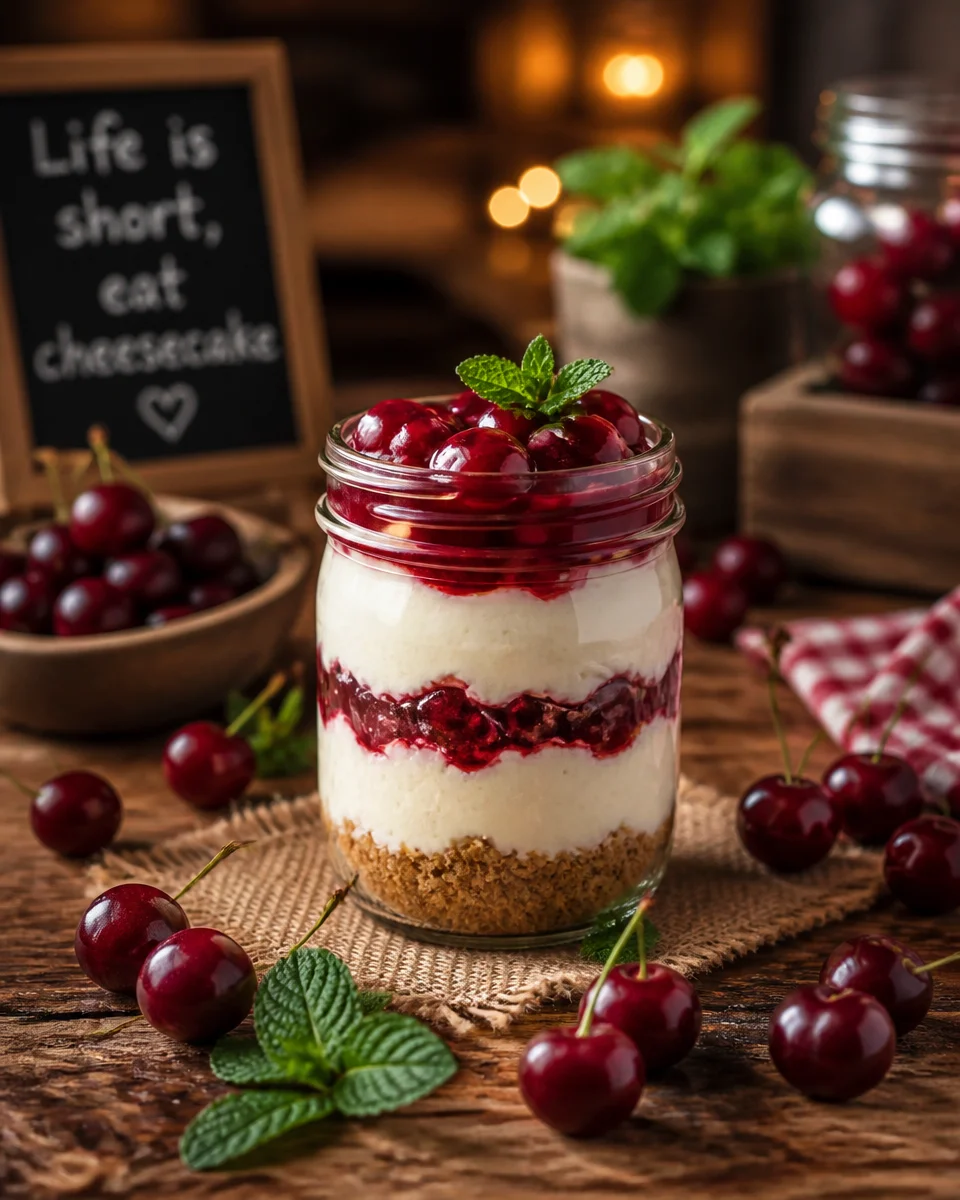
3 Layers in No-Bake Cheesecake Jars
Let’s talk layers, because this is what makes the jars look cute and taste like a real cheesecake experience. I keep it simple: crust, filling, topping. That’s it. If you can make a sandwich, you can layer a jar.
Layer 1: The crumbly crust
This is the base that gives you that classic cheesecake bite. I usually go with graham crackers, but cookies totally work too. You press it down lightly so it holds, but you don’t need to mash it into a rock.
Layer 2: The creamy cheesecake filling
This is the star. Smooth, slightly tangy, not too sweet. When I nail the texture, I feel weirdly proud of myself, like I just did something impressive even though it took me maybe ten minutes.
Layer 3: The topping
This is where you can make it look bakery level with basically no effort. Fruit, caramel, chocolate, jam, crushed cookies, whatever you’re into.
Little serving tip: use clear jars or small cups if you can. Seeing the layers makes people want to eat it immediately. Also, if you’re doing a dessert spread, these jars sit nicely next to other quick treats like 2-ingredient banana donut holes.

2 Parts to Cheesecake Filling
The filling is super simple, but I think it helps to understand what’s going on so you get the texture you want. I think of it as two parts that come together.
Part one is the cream cheese base. This gives you the tang and that real cheesecake flavor. You want it softened so it mixes smoothly. Cold cream cheese can turn lumpy, and then you’ll be standing there annoyed, smashing lumps with a spoon. Been there.
Part two is the fluffy part. This is usually whipped cream (or whipped topping if you’re keeping it extra easy). Folding it in makes the filling light and spoonable, more like a mousse style cheesecake. If you skip this and just use cream cheese, it’ll taste good but feel heavy.
My small but important tip: don’t rush the mixing. Mix the cream cheese and sugar until it looks smooth, then gently fold in the whipped part. That’s how you keep it airy instead of runny.
And if you’re planning a fun mix and match dinner night with different dietary needs, you could do something like 3-ingredient gluten-free wraps for the main meal and then let everyone top their own jar for dessert.
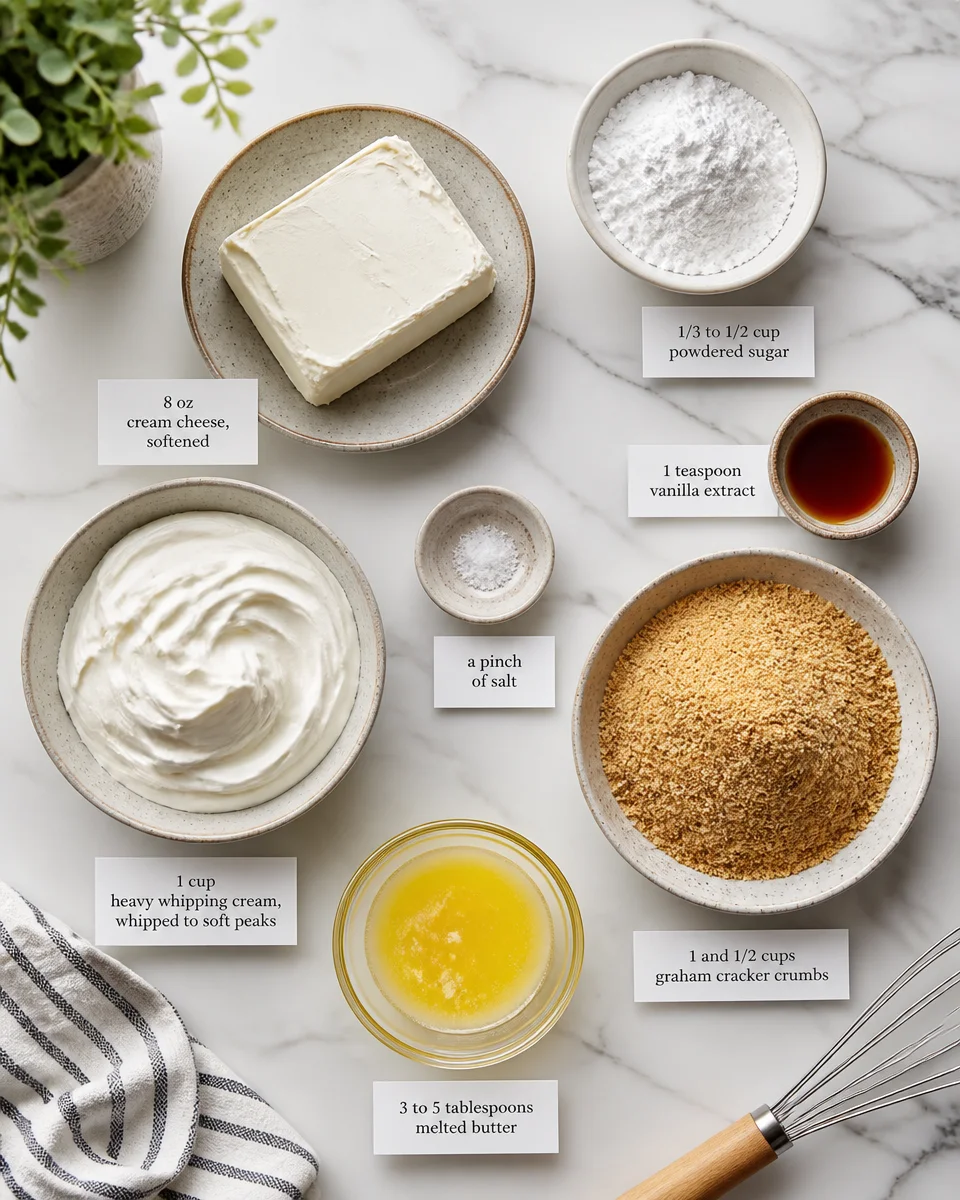
Cheesecake Jar Filling Ingredients
Here’s what I use most of the time. This makes about 6 small jars, depending on size and how generous you are with the layers. If you’re like me, you’ll “accidentally” make one jar extra full for yourself.
What you will need
- 8 oz cream cheese, softened
- 1 third to 1 half cup powdered sugar (start smaller, taste, then adjust)
- 1 teaspoon vanilla extract
- 1 cup heavy whipping cream, whipped to soft peaks (or 1 to 1 and a half cups whipped topping)
- Pinch of salt (optional, but it makes the flavor pop)
For the crust layer: 1 and 1 half cups graham cracker crumbs (or cookie crumbs), plus 3 to 5 tablespoons melted butter. Mix until it looks like damp sand.
Quick directions: Beat cream cheese, powdered sugar, vanilla, and salt until smooth. In a separate bowl, whip the cream. Fold whipped cream into the cream cheese mixture until combined. Then you’re ready to layer.
Storage note: these keep well in the fridge for about 3 days. The crust softens a little over time, which I personally like. If you want crunchier crust, assemble closer to serving.
Toppings
This is the fun part, and it’s also where you can make your Cheesecake in a Jar feel totally different every time. If I’m serving a group, I set out a little topping bar and let people go for it. It turns dessert into an activity, and I get to sit down for once.
Some favorite topping ideas:
Fruit: strawberry slices, blueberries, raspberries, or a spoonful of cherry pie filling.
Sauces: caramel, chocolate sauce, lemon curd, or even a swirl of peanut butter.
Crunch: crushed cookies, toasted nuts, or extra graham crumbs.
Cozy vibes: a sprinkle of cinnamon, mini chocolate chips, or crushed toffee bits.
If you want a fun twist, try doing an apple style topping and you’ll get that cozy dessert feeling without baking a whole pie. I love recipes like apple cinnamon cake for inspiration when I’m craving that warm spice vibe.
One more thing: if you’re making these for kids, keep one or two jars super simple with just sprinkles or chocolate chips. Simple usually wins.
Common Questions
1) How long do no-bake jars need to chill?
At least 2 hours, but overnight is even better. The filling firms up and the flavor gets a little richer.
2) Can I make Cheesecake in a Jar without heavy cream?
Yes. You can use whipped topping for the easiest swap. You can also use thick Greek yogurt for a tangier, slightly lighter version, but it won’t be as fluffy.
3) What kind of jars should I use?
Any small jar or cup works. I like 6 to 8 oz jars. Even little plastic cups with lids are fine for parties.
4) Why is my filling runny?
Usually it’s because the whipped cream was too soft, or the cream cheese was warm and loose. Chill the filling for a bit and it should thicken. Next time, whip the cream to soft peaks and fold gently.
5) Can I freeze these jars?
You can, but the texture changes slightly. It becomes more like an ice cream cheesecake vibe. Thaw in the fridge for a few hours before eating.
A sweet little send off
If you try Cheesecake in a Jar, I hope it becomes one of those recipes you keep in your back pocket for busy weeks and happy get togethers. It’s simple, it’s cute, and it tastes like you picked it up from a bakery even though you made it in your own kitchen. If you want more inspiration, I’ve enjoyed reading Slow Cooker Cheesecake in a Jar – Sprinkle Bakes and also this super helpful guide for No-Bake Cheesecake Jars – Sally’s Baking Addiction. Now go grab a spoon, stash a jar in the fridge, and thank yourself later.
Cheesecake in a Jar
Ingredients
For the crust
- 1.5 cups graham cracker crumbs (or cookie crumbs) Plus 3 to 5 tablespoons melted butter for texture
For the cheesecake filling
- 8 oz cream cheese, softened Ensure it’s softened for smooth mixing
- 0.33-0.5 cup powdered sugar Adjust to taste
- 1 teaspoon vanilla extract
- 1 cup heavy whipping cream, whipped to soft peaks Can substitute with whipped topping
- 1 pinch salt Optional, enhances flavor
Instructions
Preparation
- Mix the graham cracker crumbs with melted butter until it looks like damp sand.
- In a mixing bowl, beat the softened cream cheese with powdered sugar, vanilla extract, and salt until smooth.
- In a separate bowl, whip the heavy cream to soft peaks.
- Gently fold the whipped cream into the cream cheese mixture until fully combined.
Layering
- In your jars, start with a layer of the crumb mixture, pressing it down lightly.
- Add a layer of the cheesecake filling on top of the crumb layer.
- Repeat layers until you reach the top of the jar, finishing with the cheesecake filling.